question about aluminum shrinkage

Home Model Engine Machinist Forum

Help Support Home Model Engine Machinist Forum:

This site may earn a commission from merchant affiliate links, including eBay, Amazon, and others.

werowance

Well-Known Member
HMEM Supporting Member
Joined
Sep 2, 2011
Messages
1,385
Reaction score
376
was just thinking while mowing the yard about trying my hand at casting using 3d printed pattern. ive done normal sand casting's - very few and not important pieces either. but while my mind was wandering while mowing i was wondering just how much shrinkage really occurs when casting aluminum?
i understand there are many variables such as alloy, head preasure and extra liquid metal pushing into the mold, pour temperature and mold temperature and just a whole lot of other things.

but that said, i was just wondering if there was a close or base rule of thumb like 5% shrinkage is a good starting point for unknown mixture of alluminum alloys like a batch of old extruded alumunum mixed with 6061, 2024 and beer cans for example.
i do understand without knowing all the variables it would likely be impossible to say just how much but if i took a 1-2-3 block and wanted to use it as a pattern to cast in aluminum, would the outcome piece be roughly 5%, 10% etc smaller? how much bigger would you start with your pattern with the given unknown alloy as just see?

if using a broken part that maybe i glued back together - lets say an old water pump off a truck, would i layer up wax on the outside to make it a little bit bigger? (that thought came from seeing a video of foundry work being done on a Navy ship of what appeared to be a differential cover and they took the old one that was cracked and cast a new one from it. but didnt show them adding any wax or anything to enlarge it to compensate for shirinkage.
 
Hello werowance,

I have cast around 12 parts ever but I did keep track of the one dimension while doing them out of curiosity. I did cast some crankcases and while my pattern diameter around the lugs was exact 35,0mm I did end up with 34,3mm parts mostly. They seem to deviate a little but not much. I would say that in my case I did have 2% of shrinkage. Hope this is of some help / relevance for you. I did sandcasting with AlSi12 aluminium.

See here:

rgds
Olli
 
was just thinking while mowing the yard about trying my hand at casting using 3d printed pattern. ive done normal sand casting's - very few and not important pieces either. but while my mind was wandering while mowing i was wondering just how much shrinkage really occurs when casting aluminum?
i understand there are many variables such as alloy, head preasure and extra liquid metal pushing into the mold, pour temperature and mold temperature and just a whole lot of other things.

but that said, i was just wondering if there was a close or base rule of thumb like 5% shrinkage is a good starting point for unknown mixture of alluminum alloys like a batch of old extruded alumunum mixed with 6061, 2024 and beer cans for example.
i do understand without knowing all the variables it would likely be impossible to say just how much but if i took a 1-2-3 block and wanted to use it as a pattern to cast in aluminum, would the outcome piece be roughly 5%, 10% etc smaller? how much bigger would you start with your pattern with the given unknown alloy as just see?

if using a broken part that maybe i glued back together - lets say an old water pump off a truck, would i layer up wax on the outside to make it a little bit bigger? (that thought came from seeing a video of foundry work being done on a Navy ship of what appeared to be a differential cover and they took the old one that was cracked and cast a new one from it. but didnt show them adding any wax or anything to enlarge it to compensate for shirinkage.
I use 3/16" to foot shrink rule.

Dave
 
1/77 shrinkage in most aluminium's, this figure from when I managed an aerospace foundry (Boeing and Airbus work mostly).

Then you also have to work out the shrinkage of the 3D printed pattern and add the two together for an overall scaling factor for the 3D model.
 
was just thinking while mowing the yard about trying my hand at casting using 3d printed pattern. ive done normal sand casting's - very few and not important pieces either. but while my mind was wandering while mowing i was wondering just how much shrinkage really occurs when casting aluminum?
i understand there are many variables such as alloy, head preasure and extra liquid metal pushing into the mold, pour temperature and mold temperature and just a whole lot of other things.

but that said, i was just wondering if there was a close or base rule of thumb like 5% shrinkage is a good starting point for unknown mixture of alluminum alloys like a batch of old extruded alumunum mixed with 6061, 2024 and beer cans for example.
i do understand without knowing all the variables it would likely be impossible to say just how much but if i took a 1-2-3 block and wanted to use it as a pattern to cast in aluminum, would the outcome piece be roughly 5%, 10% etc smaller? how much bigger would you start with your pattern with the given unknown alloy as just see?

if using a broken part that maybe i glued back together - lets say an old water pump off a truck, would i layer up wax on the outside to make it a little bit bigger? (that thought came from seeing a video of foundry work being done on a Navy ship of what appeared to be a differential cover and they took the old one that was cracked and cast a new one from it. but didnt show them adding any wax or anything to enlarge it to compensate for shirinkage.
Hi,

I was involved with casting as an educator at a school level where we used (UK) LM4 alloy and the accepted shrink rate is around 6 - 7% which is what is generally accepted as the ballpark figure for aluminium although some parts of a casting such as thin webs etc may shrink less as they freeze faster. A competent founder (sandcaster) will use metal 'chills' in the sand next to thicker parts of the casting to cause it to freeze more quickly so as to prevent faults where thin sections meet larger sections of the casting - all parts of the skill of a craftsman. It is possible to buy rulers that have the casting allowance for a given material for use by patternmakers. Have a look here for an introduction to the ISO standards for casting allowances, it gives a bit of background information.

To quote a UK foundry with at least 60 years experience:
" As an example, aluminium shrinks by over 6% during solidification while copper shrinks by nearly 5%."

Sources:
LM4 aluminium - Aluminium Casting Alloy - LM4 (EN 1706 AC-45200) - Draycast Foundries Limited
Shrinkage - Shrinkage in sand casting | Haworth Castings | UK Aluminium Sand Castings and Gravity Die Castings Foundry

TerryD
 
Last edited:
I think the 6% figure in your reference refers to the volumetric shrinkage. Linear shrinkage is more like up to 2% for aluminium, 1% for iron, somewhere in between for brasses and bronzes.

A typical paternmakers' rule(r) for cast iron would be have a scale increased by 1/8" per foot.
 
I think the 6% figure in your reference refers to the volumetric shrinkage. Linear shrinkage is more like up to 2% for aluminium, 1% for iron, somewhere in between for brasses and bronzes.

A typical paternmakers' rule(r) for cast iron would be have a scale increased by 1/8" per foot.
Hi, Depends on the alloy, lm4 can be as little as 2% while lm10 (from memory) is as much as 10%. The 1/8" per 1' (medieval) allowance you mention is for cast iron and it's alloys which has a much smaller shrinkage.

TerryD
 
Terry, read further down your Hackworth link, the 5-6% is solidification shrinkage

Pattern Makers shrinkage further down the page as they call is is the length, width and depth shrinkage which they say is upto 2.5%.

Like the others I tend to use 1% for iron and 1.5 to 2 % for aluminium. 1/8"/ft is 1:96 so very similar to 1%

Look at this pattern makers rule and see what the percentage works out at
https://www.artisanfoundry.co.uk/product_info.php?products_id=206
 
Last edited:
Terry in your first post you say LM4 is 6% then you say it's 2%?

Have a read of this document or just skip to actual page 87 where it gives the pattern makers shrinkage for LM4. All the other LM alloys are also listed elsewhere. You will see it is 1.3% or 1in75 same as that rule I linked to and the Britich Standard document give sall teh LM alloys the same shrinkage

https://automaterials.files.wordpre...ting-alloys-specification-and-data-sheets.pdf
 
so if i want a 12" x 12" x 2" block of ali of unknown alloy, would your best guess start out pattern be around 2% larger than that? yes this is just an example that im asking about. im certainly not up to the level where i start thinking about thin walls and the runners and such. im just right now thinking in "general" cave man style casting lol. ill probably not even get as far as printing out a pattern as this was just me "bored" thinking while mowing but i do want to some day cast some crude or simple shapes like a square or rectangle block with mounting lugs. sort of like a engine block for a single cylinder vertical engine that has the lugs on the bottom to screw it down to the board or something similar.
 
12.156" x 12.156" x 2.026" would be the pattern size to hopefully get a finished aluminium casting of 12 x 12 x 2 allowing 1.3% or 1in75 linear shrinkage.

12 x 1.013 = 12.156" this would be 5/32"/ft in old money and the 3/16"/ft mentioned elsewhere is about 1.5%

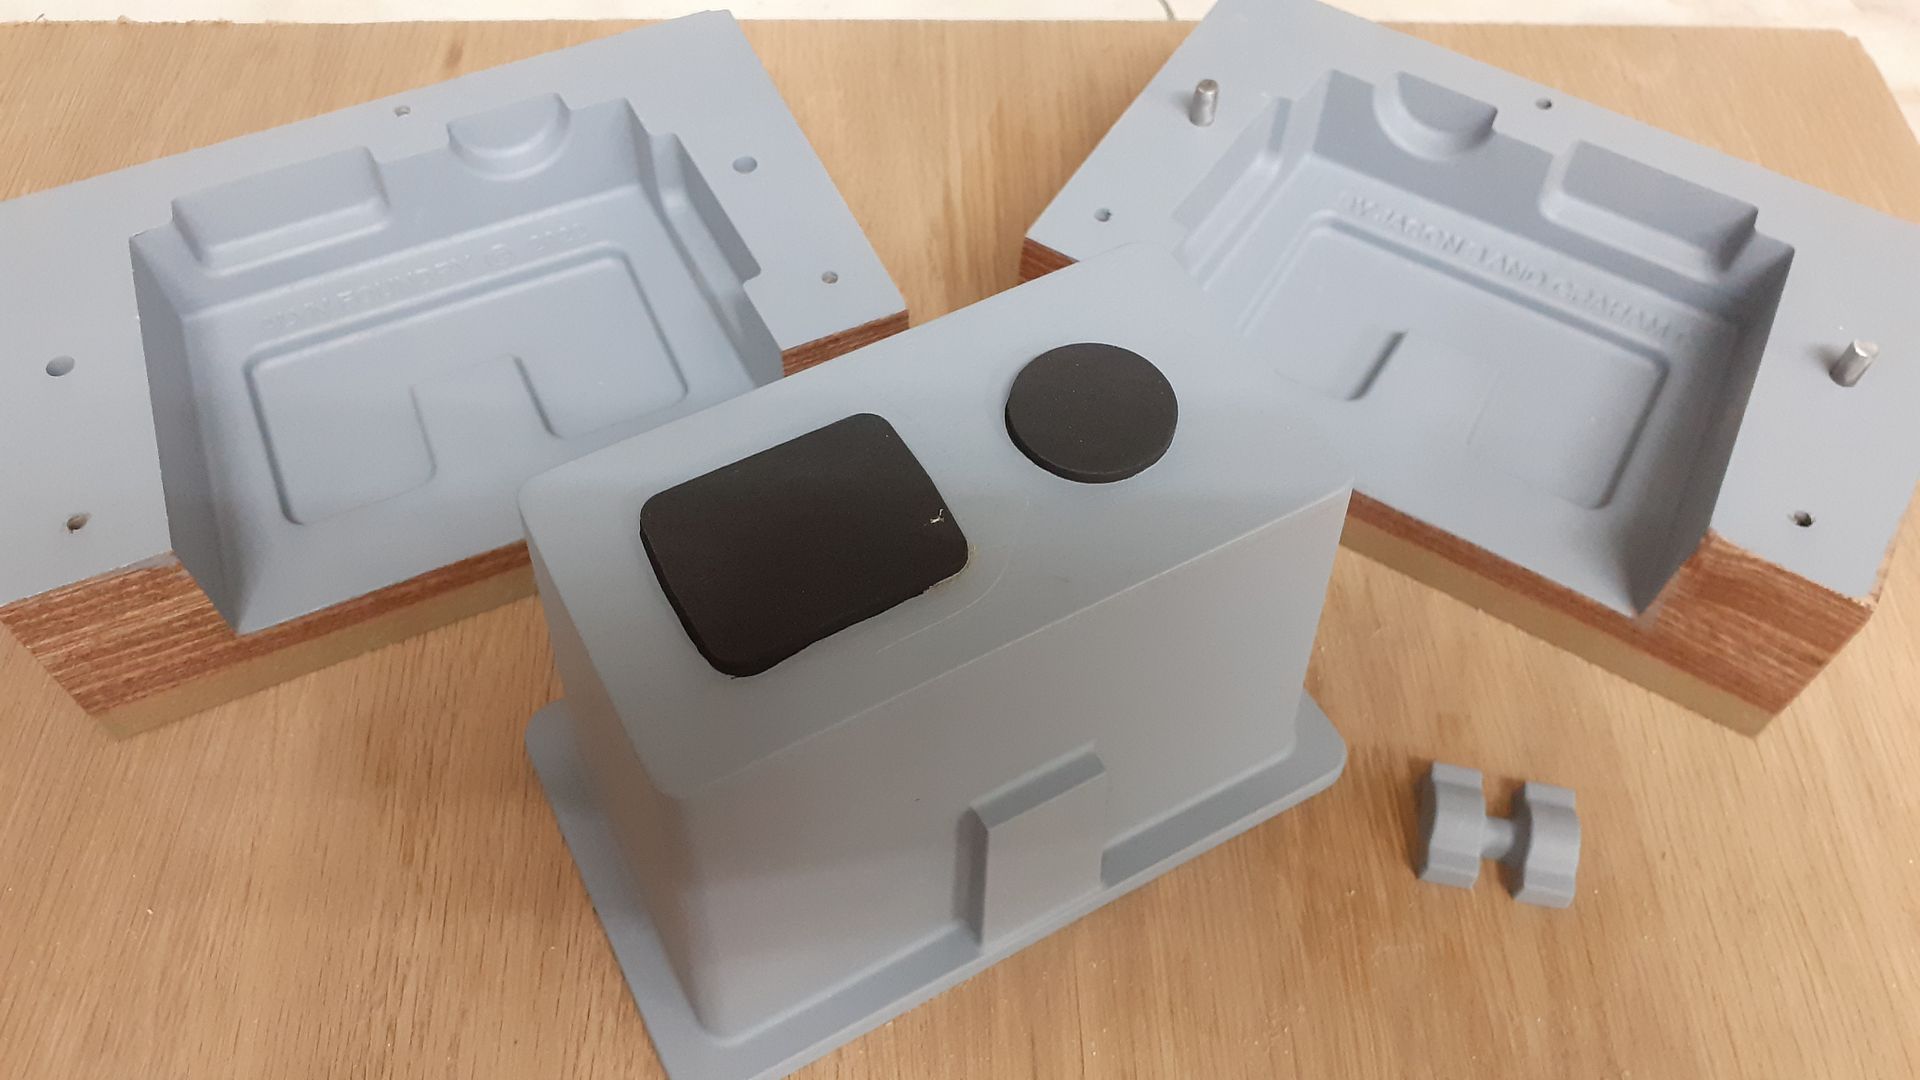
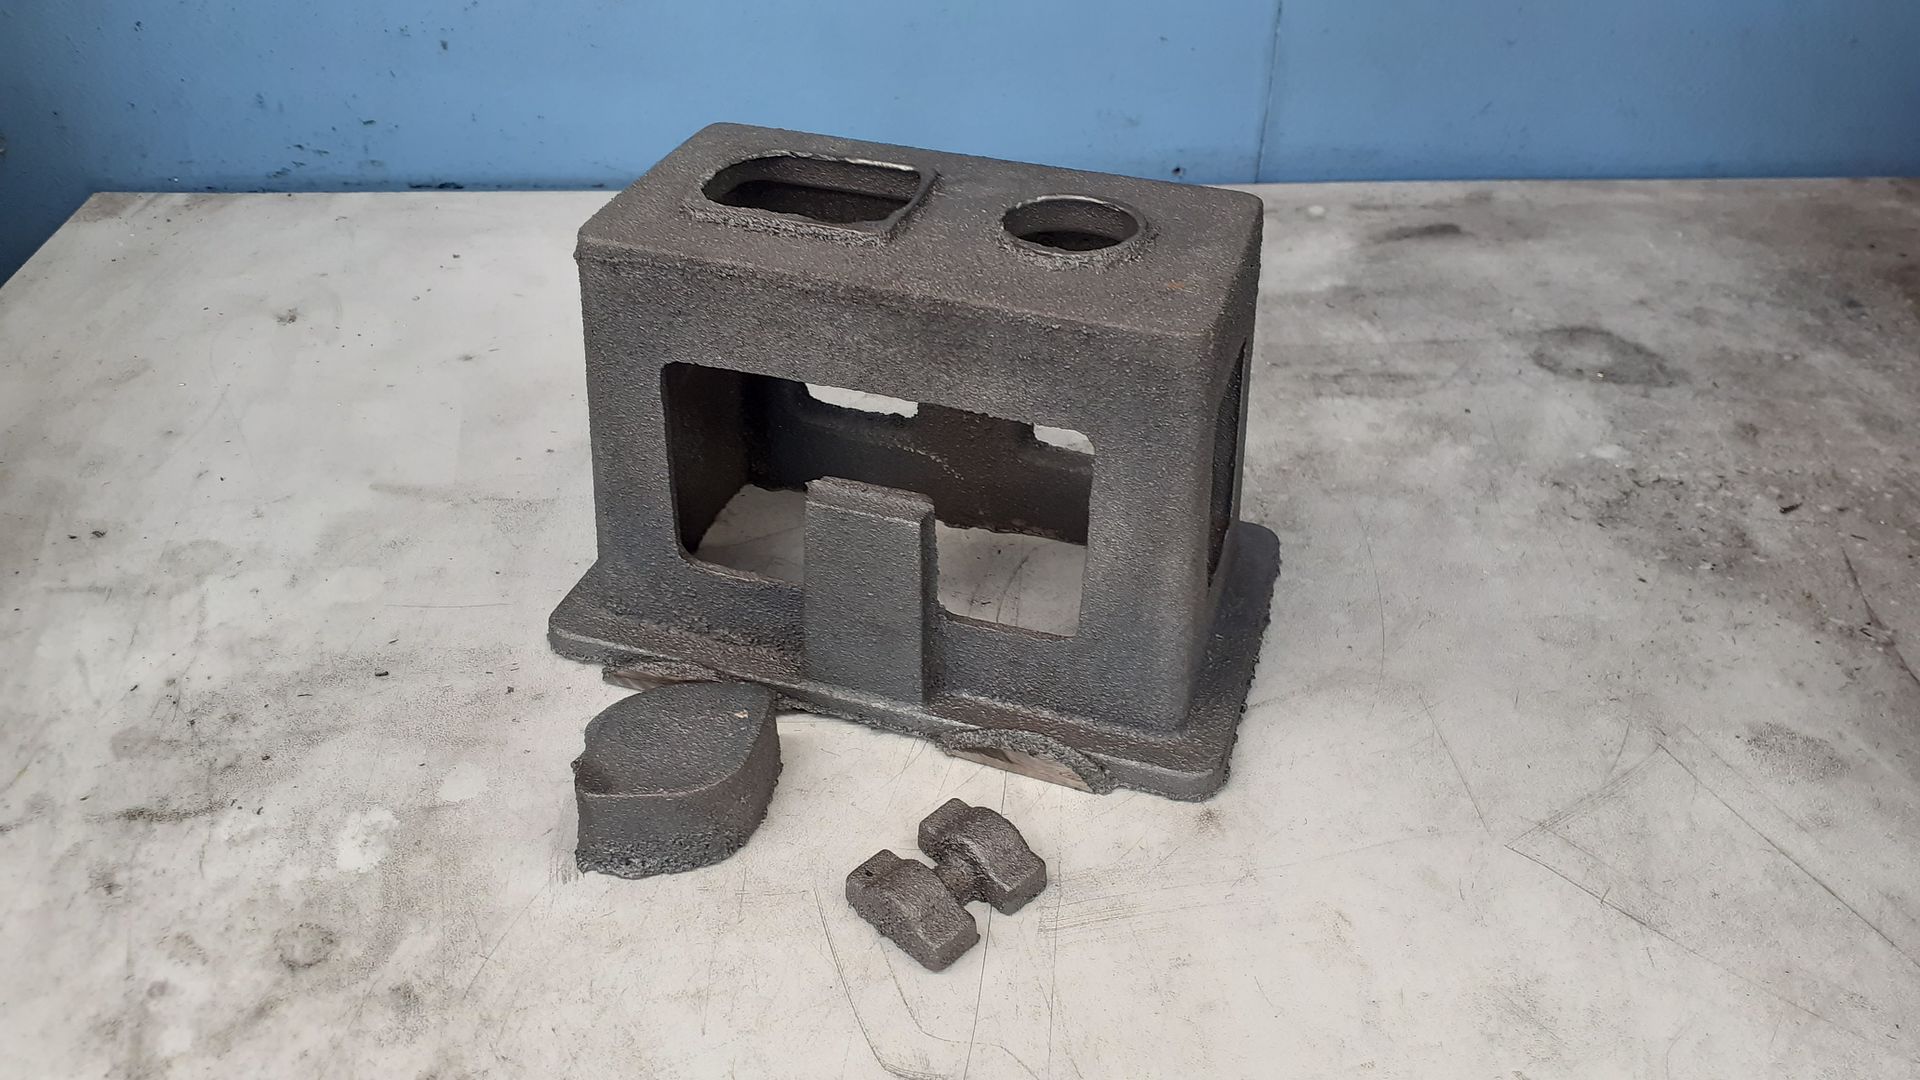
I don't know how you do your designing but I use CAD so draw the finished part, add any machining allowances, ( usually 2.5mm) add any draft angles (usually 2-3 degrees) and then the last thing I do is scale the part in cad by a factor of 1.01 for iron which most of my patterns are for or 1,015 for aluminium.

This recent iron one was within 0.2mm of intended size. That's the pattern in the middle and two corebox halves

20220428_144411.jpg


20220519_130038(1).jpg


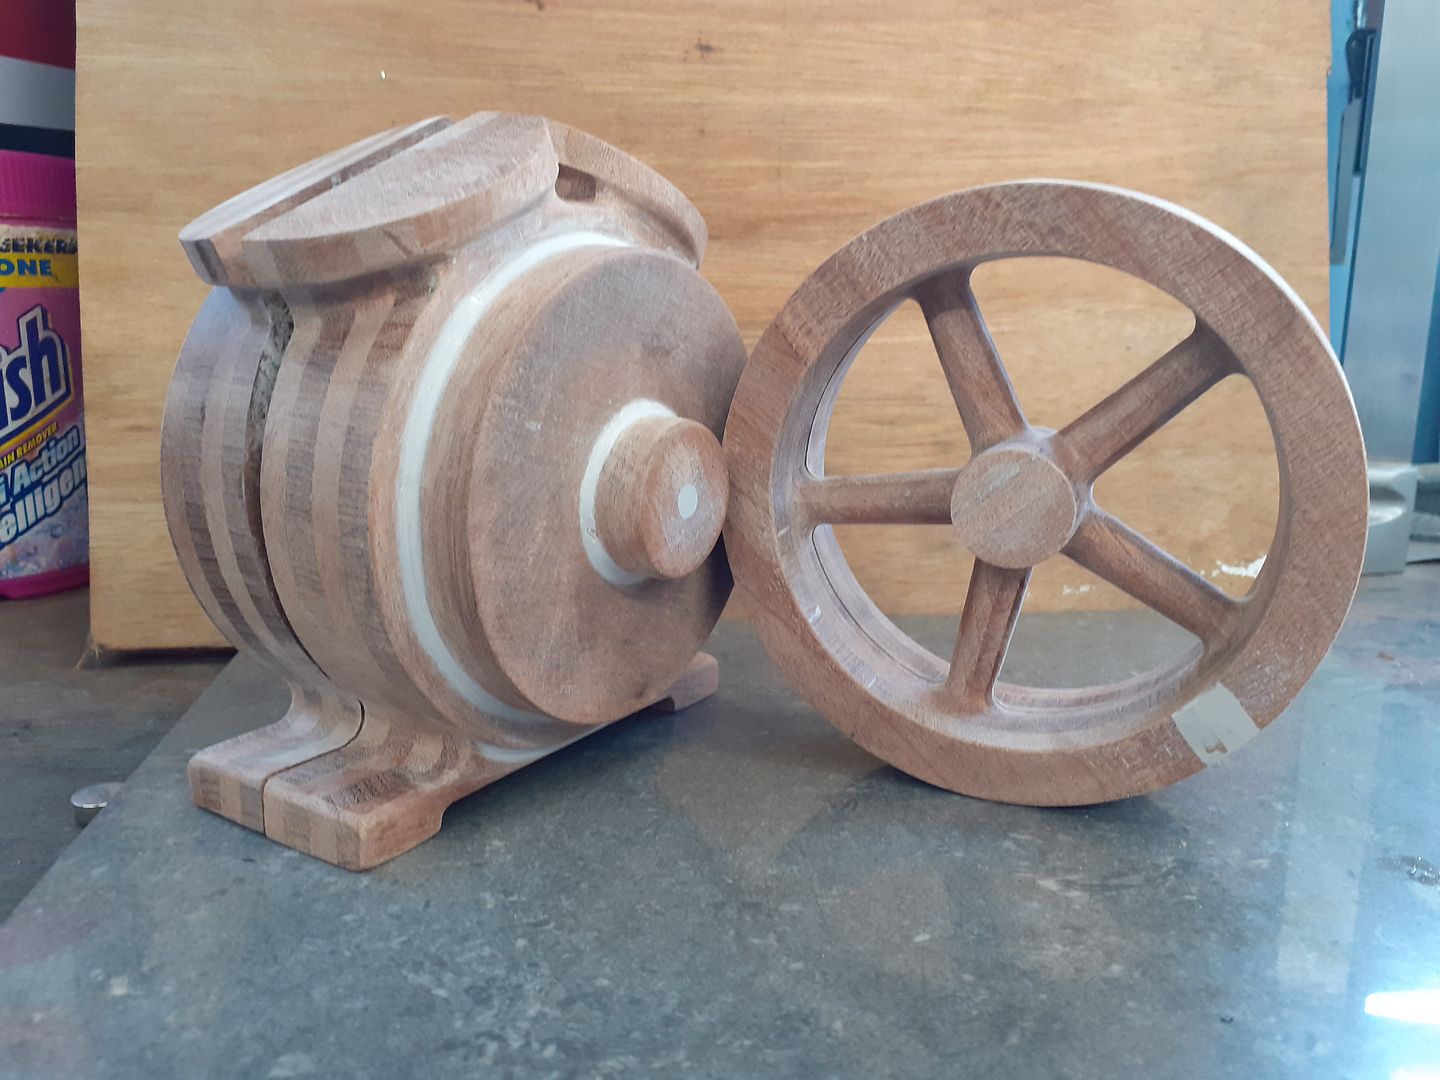
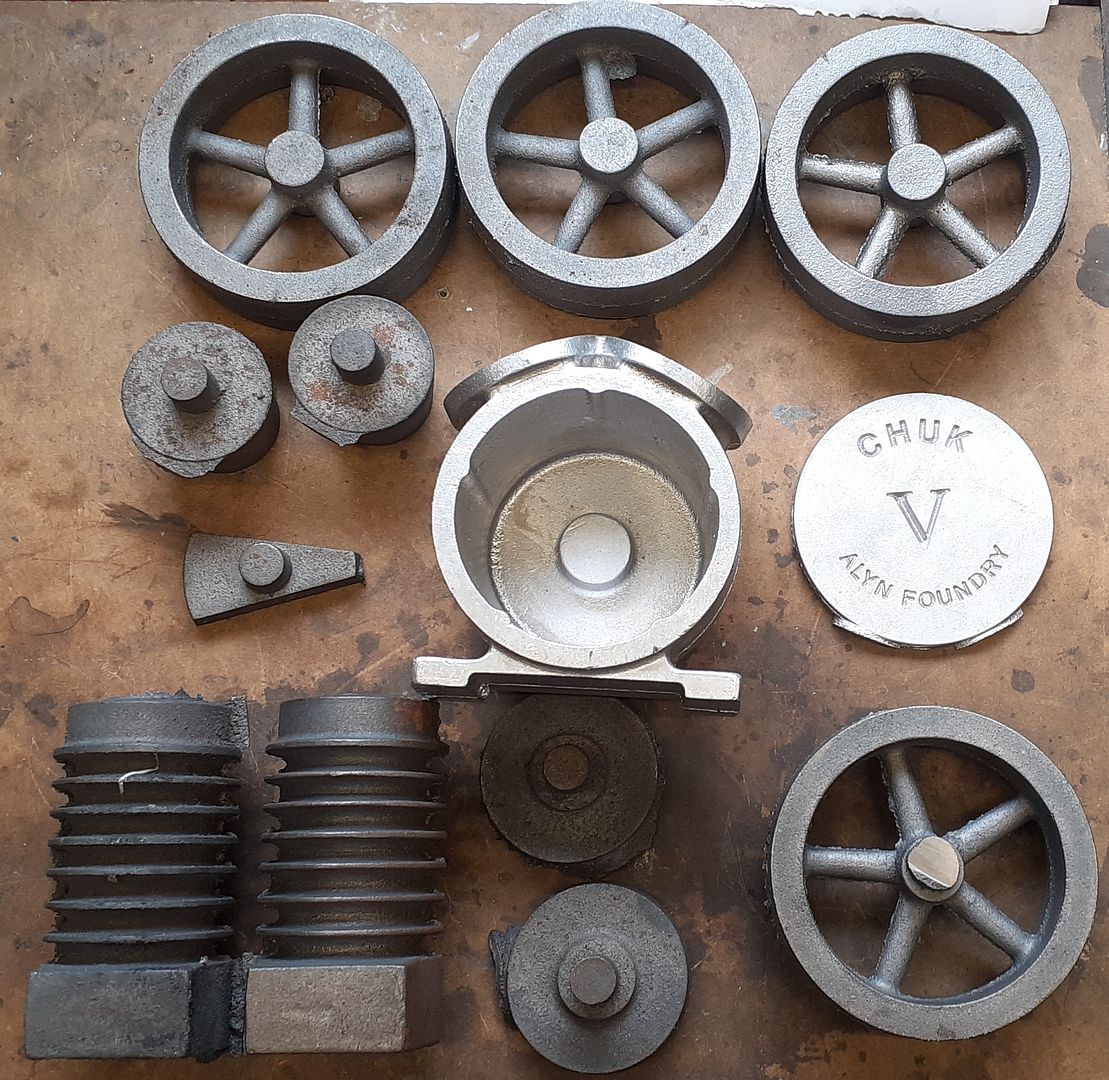
As Were these aluminium ones, iron cylinder castings are from existing patterns, crankcase, flywheel and case cover with writing from my patterns


20201102_115747.jpg


20210726_151502.jpg
 
Last edited:
Jason B has it right.

And I have not seen any hobby folks use chills, but instead they typically use risers at the larger parts of a casting, when there is a variation of both thin and thick parts of a casting.

Its not that you could not use chills, but I think risers are an easier solution to the shrinkage problem in thick areas of a casting.

And the term "chills" is something inserted into the mold to cool the metal more quickly, not to be confused with "chills" which can be used to describe hard spots in a casting.

Proabably a good reason to avoid using chills in gray iron castings is that if you cool iron too fast, the graphite does not have time to distribute in the casting, and you can have parts of an iron casting that have the hardness of tool steel.

.
 
Last edited:
if using a broken part that maybe i glued back together - lets say an old water pump off a truck, would i layer up wax on the outside to make it a little bit bigger? (that thought came from seeing a video of foundry work being done on a Navy ship of what appeared to be a differential cover and they took the old one that was cracked and cast a new one from it. but didnt show them adding any wax or anything to enlarge it to compensate for shirinkage.

This is one of the problems with the odd unscrupulous "recast". Often a thin layer of aero ply and or bondo(body filler) is added to give a new machining allowance and any drilled or tapped holes filled but you can't actually stretch the part being used so it ends up a little undersize. If using green or oil bound sand you can give the pattern a bit more of a wiggle before withdrawing it to enlarge the cavity in the sand but it's not ideal particularly if the part is quite long in one direction as you don't get a proportional increase in cavity size. Might be able to do the same with resin and air set sands but would need to time it right before they set.
 
Thank you all very much for all the knowledge you have shared. i really do appreciate it. and the different casting examples you all have shown are AWESOME and im sure you already know it but you all are very very talented.
 
A very good question .
Werowance , Thank you !
I have not cast but I am very interested in this topic
Thank you all very much for all the knowledge you have shared !!
 
One trick for using an original part for a pattern is like JasonB says, build up the surfaces that need to be machined.
You can build up some of the other surfaces a bit too if you want, or leave them as-is.

Sheet rock wall patch filler can be used as a temporary way to build up a part without damaging the part.
You can also use tongue depressors, which are an ideal thickness and uniformity.

Here is an example in gray iron.
The owner wanted to retain the original lettering, and did not want to permanently modify the original bearing cap.

This was a rushed free job, and so otherwise I would have filled and sanded a bit more, and used less blue painter's tape.

.

2rImg_2490.jpg

.
rImg_2506.jpg
rImg_3274.jpg
rImg_3275.jpg
rImg_3290.jpg
rImg_5700.jpg
rImg_5725.jpg
rImg_5732.jpg


rImg_5759.jpg


rImg_5826.jpg
 
Last edited:
was just thinking while mowing the yard about trying my hand at casting using 3d printed pattern. ive done normal sand casting's - very few and not important pieces either. but while my mind was wandering while mowing i was wondering just how much shrinkage really occurs when casting aluminum?
i understand there are many variables such as alloy, head preasure and extra liquid metal pushing into the mold, pour temperature and mold temperature and just a whole lot of other things.

but that said, i was just wondering if there was a close or base rule of thumb like 5% shrinkage is a good starting point for unknown mixture of alluminum alloys like a batch of old extruded alumunum mixed with 6061, 2024 and beer cans for example.
i do understand without knowing all the variables it would likely be impossible to say just how much but if i took a 1-2-3 block and wanted to use it as a pattern to cast in aluminum, would the outcome piece be roughly 5%, 10% etc smaller? how much bigger would you start with your pattern with the given unknown alloy as just see?

if using a broken part that maybe i glued back together - lets say an old water pump off a truck, would i layer up wax on the outside to make it a little bit bigger? (that thought came from seeing a video of foundry work being done on a Navy ship of what appeared to be a differential cover and they took the old one that was cracked and cast a new one from it. but didnt show them adding any wax or anything to enlarge it to compensate for shirinkage.
If you are old school -- prior to calculators and digital aids-- the pattern is laid out with a shrink rule and the dimensions of the scale account for the shrink of the metal upon cooling. The dimensions come from the casting drawing in finished form. Not sure where you would get a shrink rule these days. Digital calculations can be made if you have the correct information or are willing to cast a piece and come up with your own shrink numbers. Just make sure if using a shrink rule it is for the right metal. By the way shrinkage can be significant. One of the first engineering courses I took covered this issue and several others in casting. Engineering Universities no longer teach with the hands on approach. Kind of sad in a way.
 
was just thinking while mowing the yard about trying my hand at casting using 3d printed pattern. ive done normal sand casting's - very few and not important pieces either. but while my mind was wandering while mowing i was wondering just how much shrinkage really occurs when casting aluminum?
i understand there are many variables such as alloy, head preasure and extra liquid metal pushing into the mold, pour temperature and mold temperature and just a whole lot of other things.

but that said, i was just wondering if there was a close or base rule of thumb like 5% shrinkage is a good starting point for unknown mixture of alluminum alloys like a batch of old extruded alumunum mixed with 6061, 2024 and beer cans for example.
i do understand without knowing all the variables it would likely be impossible to say just how much but if i took a 1-2-3 block and wanted to use it as a pattern to cast in aluminum, would the outcome piece be roughly 5%, 10% etc smaller? how much bigger would you start with your pattern with the given unknown alloy as just see?

if using a broken part that maybe i glued back together - lets say an old water pump off a truck, would i layer up wax on the outside to make it a little bit bigger? (that thought came from seeing a video of foundry work being done on a Navy ship of what appeared to be a differential cover and they took the old one that was cracked and cast a new one from it. but didnt show them adding any wax or anything to enlarge it to compensate for shirinkage.
FYI
It simple 3/16" shrink is.
12.1875 ÷ 12 = 1.015625 for computing .

Dave
 
Last edited:
There are two different shrinkages discussed in this thread.

Solidification shrinkage is the volume change on solidification. It leads to shrinkage porosity in the case metal. The purpose of risers is to make the last solidification happen in the riser so that the shrinkage porosity is in the riser, not the casting. This is the 5-7% discussed above.

The thermal shrinkage is the length change as the part cools from the freezing temperature to room temperature. This shrinkage is 1he 1-2% linear shrinkage that is handled with patternmaker rules.

Patterns must be larger to account for the thermal shrinkage, not the solidification shrinkage.

Carl
 
Back
Top