Luck of the Dumpster

Home Model Engine Machinist Forum

Help Support Home Model Engine Machinist Forum:

This site may earn a commission from merchant affiliate links, including eBay, Amazon, and others.
Continuing on with the spindle mount...

The clamp ring is kind of a mini-project in itself given the number of steps it takes to make this thing. Also, I've stated in previous threads: SLITTING SAWS SCARE THE HELL OUT OF ME!!!!!

Note the upper screws are far too long. They're just what I have laying around. I'll get the correct length when I get to the hardware store.

Onto the pictures....

DSC01540.jpg


DSC01539.jpg


DSC01542.jpg


DSC01543.jpg


DSC01544.jpg


DSC01545.jpg


DSC01547.jpg


DSC01548.jpg


DSC01549.jpg
 
Continuing on with the spindle mount...

The clamp ring is kind of a mini-project in itself given the number of steps it takes to make this thing. Also, I've stated in previous threads: SLITTING SAWS SCARE THE HELL OUT OF ME!!!!!

Note the upper screws are far too long. They're just what I have laying around. I'll get the correct length when I get to the hardware store.

Onto the pictures....
Nice work Ved; you're gettin' closer & closer to making CNC routed chips every day! I know what you mean about mini-projects; it seems like every step of my projects lately involves the making (or buying) of a new tool or fixture.:rolleyes:

Is that a 3 jaw chuck on your mill? How'd you accomplish that?

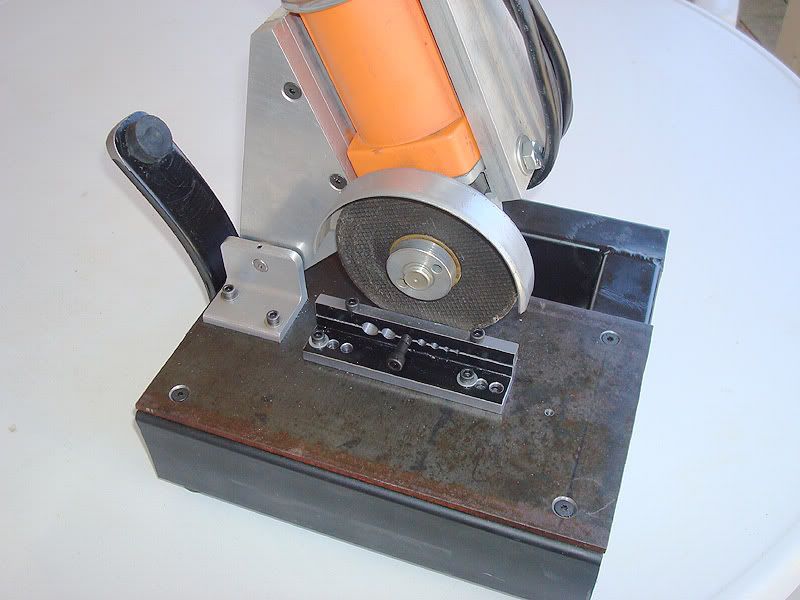
I got tired of running to the screw supply house every few weeks a couple years ago so I bought a crap-load of the longest ones of each size that were threaded all the way to the head. I made this thing I call the "Screw Chopper" from a cheap HF angle grinder. I use it all the time & it sure saves gas & time going out for screws!

 
I have a 2" three jaw Bison chuck. The end is threaded 1/2-20. I made an arbor for it so I can use a 5/8" R-8 collet to mount it. My mill is a round column mill/drill. So sometimes I'm starved for Z-axis clearance. When in a jam I use the chuck. If I just move the head up or down I lose my X and Y positioning.

As for this job, my mill head was a bit too high and I didn't have enough Z-axis to reach the ring centerline so I used the Bison to gain an extra 1-1/2" of Z-axis.

...Ved.
 
Continuing on with the router build:

I had come to decision time. It may sound odd, but I had to consider what side is the front.

If you go to the Probotix website, the CNC routers they have for sale (they have dual Y-axis motors like the one I'm building does) have the motors facing the operator. I don't know why they chose this, but it has the advantage of running less length of cable. On the other hand it places the motors in a position where they could get bumped. In my research, the most I've seen have the motors in the same orientation as the Probotix: at the front.

I decided to put my motors on at the rear of the machine. I think this will help keep crud and debris out of the moving components since most of the milling will be done towards the front where it's easier for the operator to access.

So I re-oriented the machine. I also moved the X-axis gantry to gain an extra three inches in Y-Axis travel.

I also think this will make the operator's side less cluttered after I install the electrical connectors and E-stop button.

...Ved.

DSC01550.jpg


DSC01551.jpg
 
After re-orienting the gantry, it was time to install the drag chain.

Again, this was done without any plans, I just placed the chains where it seems logical and went at it, making brackets as I went.

I'm getting excited that I may have this thing running under its own power soon!!!

...Ved.

DSC01552.jpg


DSC01554.jpg


DSC01555.jpg


DSC01556.jpg


DSC01557.jpg


DSC01558.jpg


DSC01559.jpg
 
Lookin' good Ved; it won't be long now! That drag chain looks great; did you find a reasonably priced source for it? I saw somewhere that a fellow 3d printed his own snap-together links. Must be nice!

Looking at your bridge, can you still add a couple triangulated braces in the Y-direction to reduce flexing on heavy cuts? I guess it would help in the X-direction as well but that'd mean at least 2 extra rail trucks and would reduce the travel.

Anyhoo, make sure & post up some video when the time comes!:)
 
Thanks,

The drag chain came from an e-bay store: http://www.ebay.com/itm/322232081490?_trksid=p2060353.m2749.l2649&ssPageName=STRK:MEBIDX:IT

Hell, most of the components I've had to buy for this project came from ebay.

If necessary, I can add more support, but I want to see how it cuts before putting more weight into this thing. The ball screw slides are quite heavy and at this point, I don't even know how I'm going to get the machine off the saw horses it's sitting on.

So, does anyone know how much deflection is typical for a CNC router? Obviously less is better, but there must be some acceptable level or these things would be 2000# blocks on cast iron.

...Ved.
 
Great price on the drag chain, thanks for the link!

All you need for a bunch of added rigidity is to put a diagonal aluminum brace between each y-axis vertical member & the cross-beam. Doesn't need to be big & heavy, just enough to do the job. With those big honking steppers, you don't have to worry about a little more weight.:thumbup:
 
Continuing on with the router build....

Cables! Cables! Cables! More Cables!!!!!

I figured out that thus far I've had to make 76 solder connections and I really haven't started the home sensor and E-stop wiring yet.

I partially disassembled the machine to modify a panel through which the electrical connectors are attached. The material is too thick for the connecters, so I added a pocket.

I was able to actually get the thing powered up. I made three wiring mistakes which I corrected at the control box.

I can move the machine in manual mode and it will take G-codes individually, but the BCNC software won't run a proper cutting program. I think it's because BCNC spoon feeds GRBL way too fast. Has anyone had the same issue and know how to fix it?

That's all for now....

...Ved.

DSC01565.jpg


DSC01566.jpg


DSC01564.jpg


DSC01568.jpg


DSC01570.jpg


DSC01571.jpg
 
I was able to do some initial cuts today. After a little bit of a learning curve and inverting my Y-axis, I present the following video....

[ame]http://www.youtube.com/watch?v=eq9nCpI2enQ[/ame]

I still need to receive switches for the homing sensors and the E-stop. Sometimes shipping just takes a while.

...Ved.
 
Last edited:
Nice job Ved; you got that project going very quick!:thumbup: Is that under Arduino control?
 
Yes,

It's running the Arduino as the GRBL motion controller. The bCNC software is the front end (G-code sender to GRBL). When I get some time, I'm going to see if its rigid enough to do light cuts on aluminium.

I finally realized why most CNC routers have the motors to the front, it maximizes the Y-axis travel. As it is now, the router head will pass over the end of the work area making about 1-1/4 inches of travel useless.

I considered making some brackets to gain back that distance, but on reflection I'll leave it. This overhang will allow me to re-square the X-axis when the two Y-axis motors inevitably get out of sync.

They won't go out of sync from the controller: they run off the same step and direction pulse. They'll get out of sync if someone (or thing) bumps the gantry too hard moving one side but not the other.

(I had a picture of the overhang, but there's something wrong with the website and I keep getting an "upload failed" error. Sorry.

...Ved.
 
Yes, It's running the Arduino as the GRBL motion controller. The bCNC software is the front end (G-code sender to GRBL). When I get some time, I'm going to see if its rigid enough to do light cuts on aluminium.
That's amazing stuff to me; it was hard enough for me to learn how to use Mach. Seeing what you fellows that really understand computers are able to accomplish never ceases to amaze me.

I think it will do better than you think in aluminum. You'll just have to get your feeds & speeds adjusted to suit your machine & not worry about the blinding speeds & metal hogging feats that seem to obsess everyone. After all, the goal is to make cool stuff, not to fill up one's shop with chips in 5 minutes!:rolleyes:
 
Thanks for the praise, but I'm not really doing anything novel. I'm standing on the shoulders of those that actually wrote and maintain the GRBL and bCNC projects. I just read up on it and put the components together. Those people in the open source community are the real innovators on this project.

I am an industrial machine designer/engineer, so guess I have a technical leg up than most when it comes to machine integration, but I'm no programmer.

As for the chips, I can attest at this time it makes a hell of a lot of wood dust. :p

Thanks,

...Ved.
 
Great idea, will copy this as soon as my interest in the 3D-printer thing diminishes ;-)
I love seeing you all doing impossible (for me) things!
Peter
 

Latest posts

Back
Top