You are using an out of date browser. It may not display this or other websites correctly.
You should upgrade or use an alternative browser.
You should upgrade or use an alternative browser.
Arnold building the "Little Blazer"
- Thread starter arnoldb
- Start date

Help Support Home Model Engine Machinist Forum:
This site may earn a commission from merchant affiliate
links, including eBay, Amazon, and others.
SignalFailure
Well-Known Member
- Joined
- Jan 1, 2008
- Messages
- 366
- Reaction score
- 3
When I built the Grasshopper engine, I made up this double-sided tool for doing undercuts in flywheels
Why haven't I thought of making one of those before instead of constantly swapping left/right tools? :noidea: Thanks for the idea!
zeeprogrammer
Well-Known Member
- Joined
- Mar 14, 2009
- Messages
- 3,362
- Reaction score
- 13
Gee Arnold...nothing stops you and you don't even slow down.
I like that flywheel.
Congratulations on overcoming and getting a runner.
I like that flywheel.
Congratulations on overcoming and getting a runner.
arnoldb
Well-Known Member
- Joined
- Apr 8, 2009
- Messages
- 1,792
- Reaction score
- 12
Thank you Marv. It is indeed an amazing little engine! - I'm very glad I decided to build it. And thank you; I'll make up a proper setup for winding springs in future.
Thanks Ron - all the tooling tidbits I've built helps a lot in getting the job done a bit quicker; means I get to make mistakes quicker as well!
Pleasure Paul Thm: - If you make one like it, just be careful and grind enough clearance on the side facing the outside of the flywheel to compensate for the curve it has to follow, and be sure to hone the cutting edges pretty well with an oilstone, otherwise the bit chatters like mad when cutting.
Thanks Carl - The flywheel is as per the original plans; I didn't want to change it's design, as that could make the difference between a runner and a non-runner on flame lickers. A couple of months ago I made a conscious decision not to let any little bits stop me; and that helps a lot; I think half of any job is already done by just keeping a positive attitude.
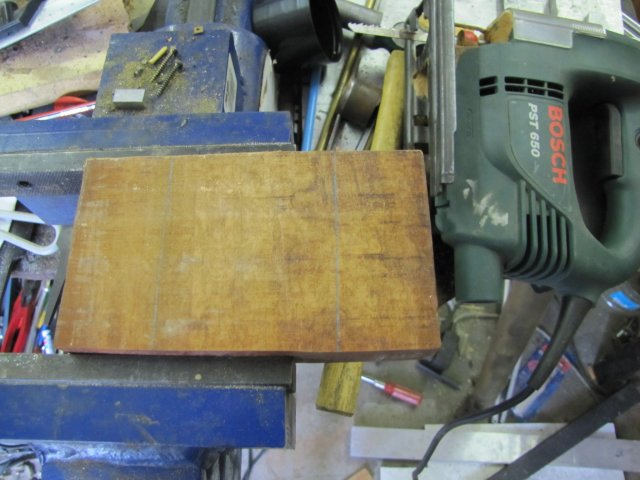
Today's bits; I started with the base, which I decided to make from wood for this engine. A bit of Rhodesian Teak trimmed to rough size with the jigsaw:
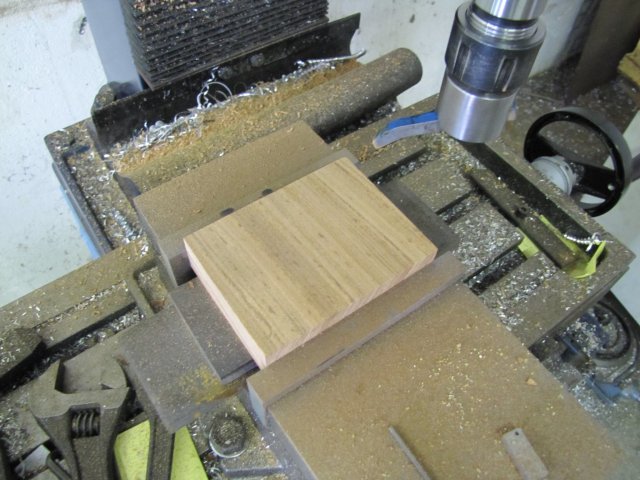
Sacrilege! - but the flycutter works a treat in trimming down and cleaning up some wood :
I will really have to invest in some proper woodworking tools at some point!
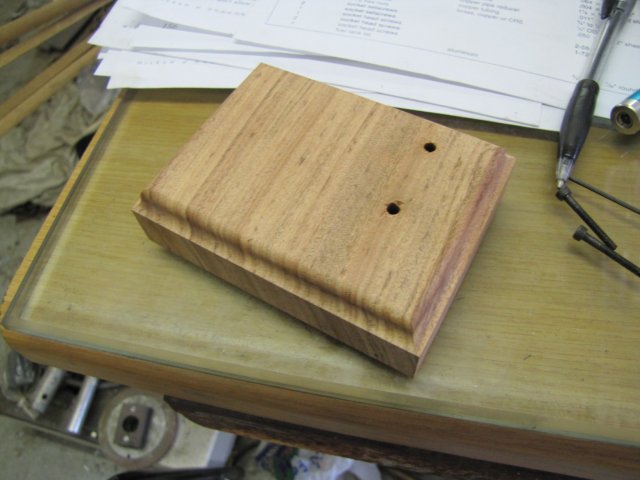
I used a router bit to pretty up the edges of the block; the mill's top speed is a bit slow for routing bits, but it does get the job done:
Just needs some oil and a good rub-down with floor wax now...
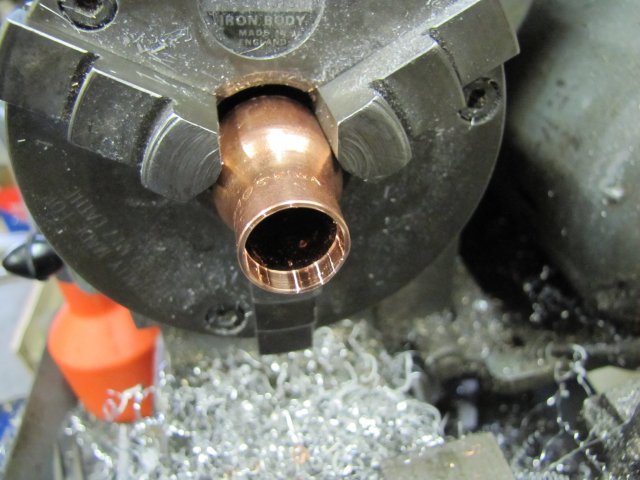
On to a 3/4" to 1/2" copper pipe reducer; trimmed up and tidied up in the lathe:
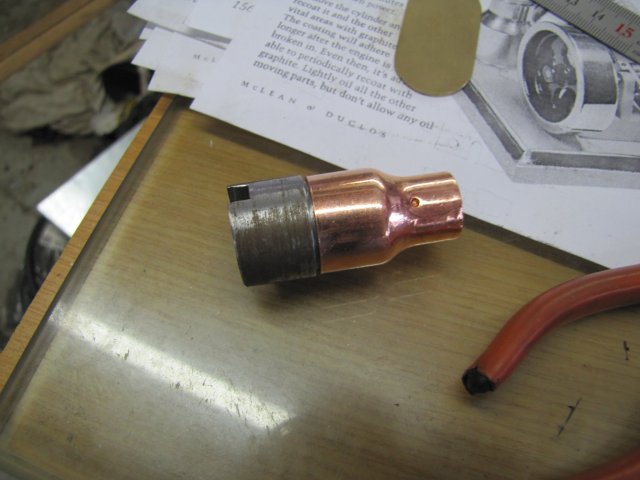
A bit of scrap HRS turned down to a fairly tight push fit in the 3/4" section of the reducer:
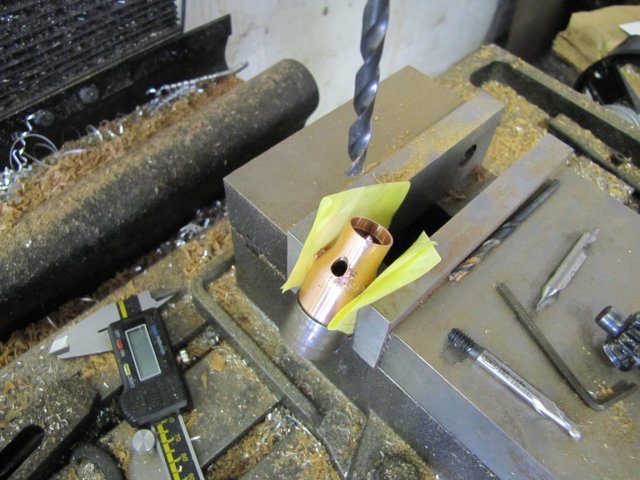
The above was needed so that I could clamp the reducer at an angle in the mill vise without squashing it. I only have 5.5mm diameter pipe for a spout, and no 5.5mm end mill, so I used a 4mm end mill to drill the hole for the spout, and then very carefully followed that with a 5.5mm drill bit. A generous serving of cutting fluid was used; copper is one of the less fun metals to machine:
One of the projects I have on the back-burner is an experimental boiler build - and I learned one good lesson from that; It takes quite a bit more heat to re-melt silver brazing that was already done than to do new brazing. With that in mind, I first silver brazed the spout in the reducer, then cleaned the bottom edge and bottom inside edge of the reducer very well with sandpaper, and made a ring from silver solder that fit in there:
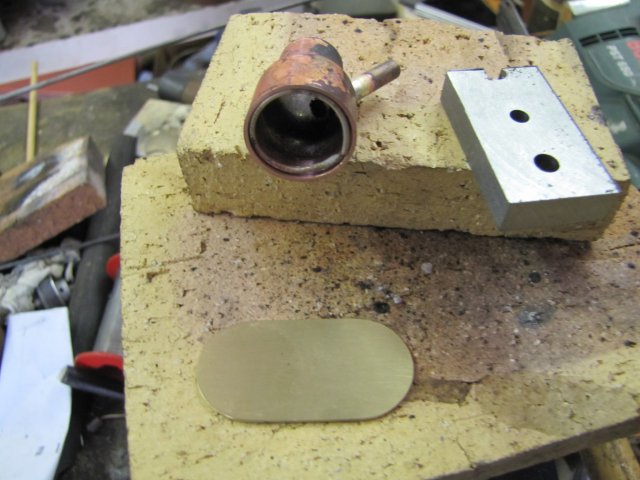
Then I liberally coated around the silver solder ring with flux, being careful not to get any flux on the outside edge. The foot plate is some 1.6mm brass that I just cleaned well with sandpaper.
I just carefully plonked the reducer part down in position on the foot plate, with a lump of steel on top to keep it in position, then let it sit like that for a couple of minutes so that the flux would gravitate down onto the brass foot plate as well, then used a blow torch to heat the lot up, concentrating the heat directly on the joint. After a short while I could see some flux bubbling to the outside as it followed the flame, then it went black and then clear, and a second or so later I could see some silver brazing wicking through. I used the flame right around the entire joint to draw the silver brazing through and let things cool down:
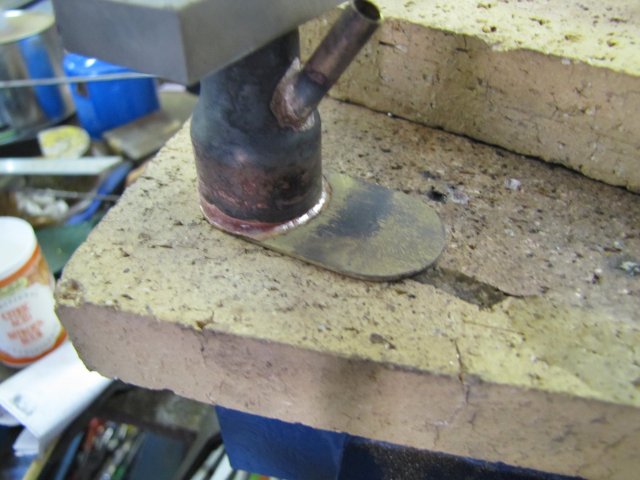
I'll happily admit that this is the best bit of silver brazing I've done to date
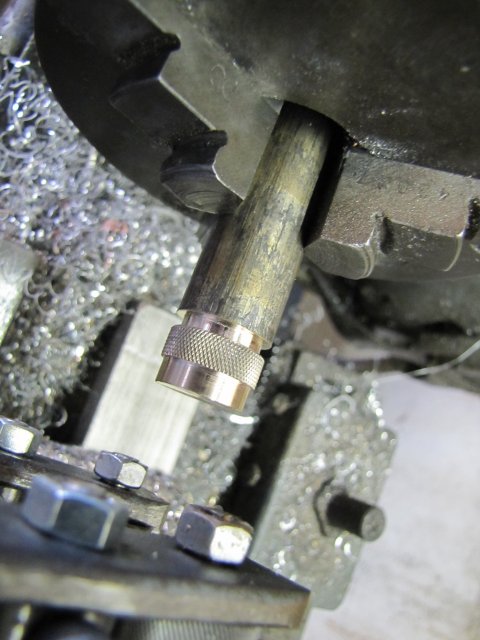
The tank was then dropped in some citric acid to have a bit of a pickle, and I started on the cap for the tank - a simple turning and knurling job:
Wicking was a bit of a problem; I'd used cotton based wicking on Fred the Loco's burner, but when the meths run out the wicking is inclined to smolder and burn off. Amongst my junk prized collection, I have a sheet of fiberglass mat... Some judicious peeling away of fibers was done, and then all aligned and rolled into a kind of string; a bit fiddly, but I got it fed into the spout in the end:
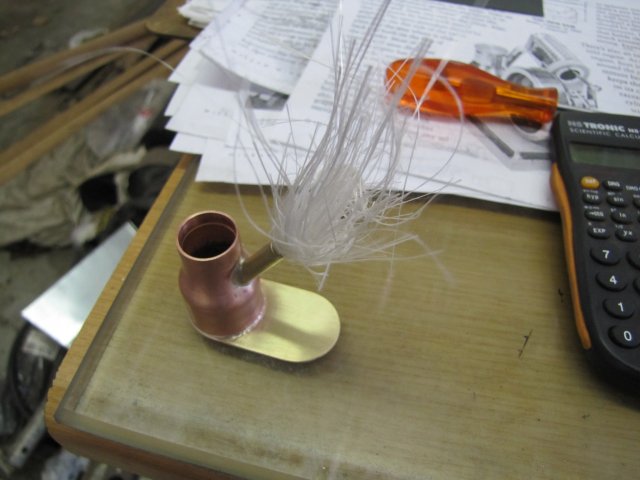
(Now it had more hair than me!)
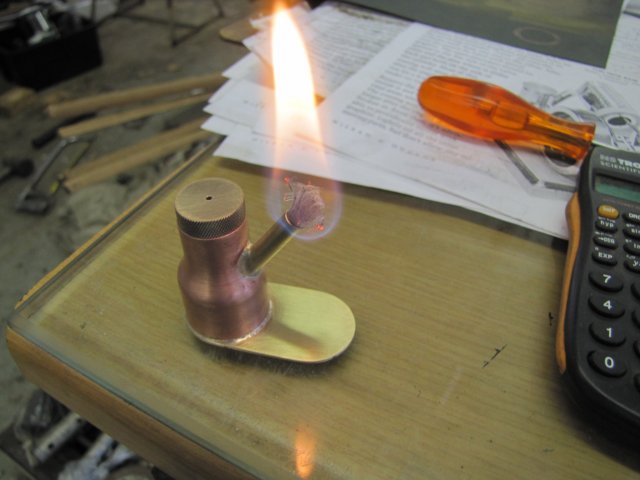
I played barber a bit, and filled the tank with meths; A purple glow quickly appeared at the top of the wick, and I tested it:
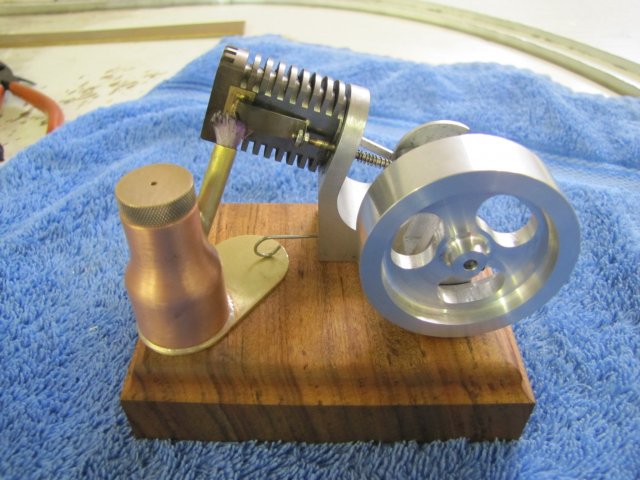
Earlier while I was waiting for the meths tank to pickle, I'd also thoroughly oiled and lightly waxed the base, So I assembled the lot, and ended up with this:
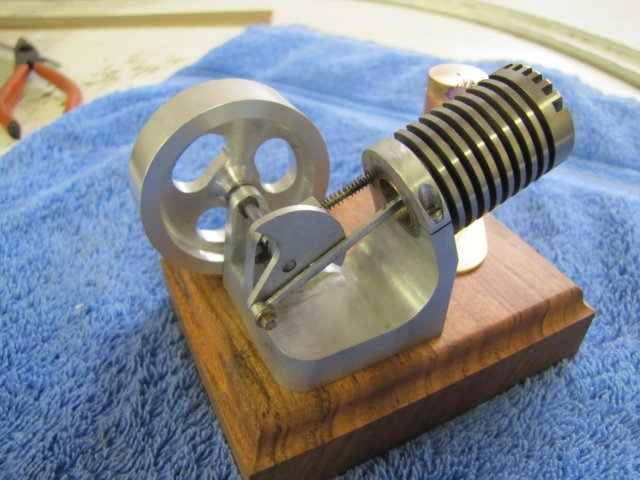
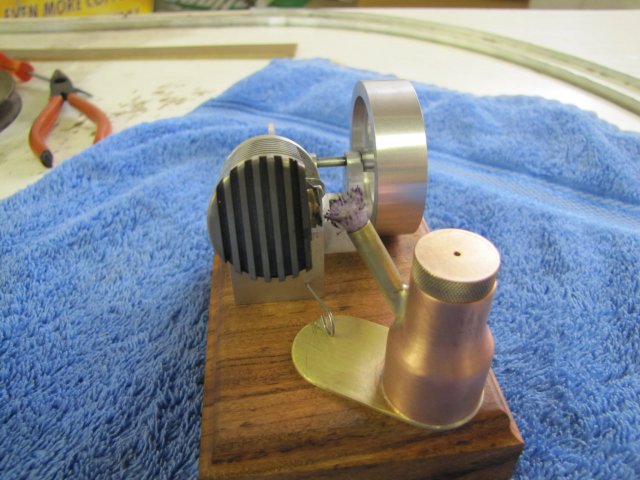
A puff of graphite powder into the cylinder, a drop of oil on each of the running bits where needed; and a lot of fiddling with wick position; it's a choosy little bugger - but it runs ;D:
[ame]http://www.youtube.com/watch?v=qX92TajOVp4[/ame]
The second part of the video was taken in my study; in the shop it was 35C and in my study with air conditioning 26C - It seems to like running in the cooler environment a lot better!
Overall a fun little project - and very very rewarding in the end!
Regards, Arnold
Thanks Ron
Pleasure Paul Thm: - If you make one like it, just be careful and grind enough clearance on the side facing the outside of the flywheel to compensate for the curve it has to follow, and be sure to hone the cutting edges pretty well with an oilstone, otherwise the bit chatters like mad when cutting.
Thanks Carl
Today's bits; I started with the base, which I decided to make from wood for this engine. A bit of Rhodesian Teak trimmed to rough size with the jigsaw:

Sacrilege! - but the flycutter works a treat in trimming down and cleaning up some wood :

I will really have to invest in some proper woodworking tools at some point!
I used a router bit to pretty up the edges of the block; the mill's top speed is a bit slow for routing bits, but it does get the job done:

Just needs some oil and a good rub-down with floor wax now...
On to a 3/4" to 1/2" copper pipe reducer; trimmed up and tidied up in the lathe:

A bit of scrap HRS turned down to a fairly tight push fit in the 3/4" section of the reducer:

The above was needed so that I could clamp the reducer at an angle in the mill vise without squashing it. I only have 5.5mm diameter pipe for a spout, and no 5.5mm end mill, so I used a 4mm end mill to drill the hole for the spout, and then very carefully followed that with a 5.5mm drill bit. A generous serving of cutting fluid was used; copper is one of the less fun metals to machine:

One of the projects I have on the back-burner is an experimental boiler build - and I learned one good lesson from that; It takes quite a bit more heat to re-melt silver brazing that was already done than to do new brazing. With that in mind, I first silver brazed the spout in the reducer, then cleaned the bottom edge and bottom inside edge of the reducer very well with sandpaper, and made a ring from silver solder that fit in there:

Then I liberally coated around the silver solder ring with flux, being careful not to get any flux on the outside edge. The foot plate is some 1.6mm brass that I just cleaned well with sandpaper.
I just carefully plonked the reducer part down in position on the foot plate, with a lump of steel on top to keep it in position, then let it sit like that for a couple of minutes so that the flux would gravitate down onto the brass foot plate as well, then used a blow torch to heat the lot up, concentrating the heat directly on the joint. After a short while I could see some flux bubbling to the outside as it followed the flame, then it went black and then clear, and a second or so later I could see some silver brazing wicking through. I used the flame right around the entire joint to draw the silver brazing through and let things cool down:

I'll happily admit that this is the best bit of silver brazing I've done to date
The tank was then dropped in some citric acid to have a bit of a pickle, and I started on the cap for the tank - a simple turning and knurling job:

Wicking was a bit of a problem; I'd used cotton based wicking on Fred the Loco's burner, but when the meths run out the wicking is inclined to smolder and burn off. Amongst my junk prized collection, I have a sheet of fiberglass mat... Some judicious peeling away of fibers was done, and then all aligned and rolled into a kind of string; a bit fiddly, but I got it fed into the spout in the end:

(Now it had more hair than me!)
I played barber a bit, and filled the tank with meths; A purple glow quickly appeared at the top of the wick, and I tested it:

Earlier while I was waiting for the meths tank to pickle, I'd also thoroughly oiled and lightly waxed the base, So I assembled the lot, and ended up with this:


A puff of graphite powder into the cylinder, a drop of oil on each of the running bits where needed; and a lot of fiddling with wick position; it's a choosy little bugger - but it runs ;D:
[ame]http://www.youtube.com/watch?v=qX92TajOVp4[/ame]
The second part of the video was taken in my study; in the shop it was 35C and in my study with air conditioning 26C - It seems to like running in the cooler environment a lot better!
Overall a fun little project - and very very rewarding in the end!
Regards, Arnold

$171.00
$190.00
Genmitsu CNC 3018-PRO Router Kit GRBL Control 3 Axis Plastic Acrylic PCB PVC Wood Carving Milling Engraving Machine, XYZ Working Area 300x180x45mm
SainSmart Official

$599.00
$649.00
FoxAlien Masuter Pro CNC Router Machine, Upgraded 3-Axis Engraving All-Metal Milling Machine for Wood Acrylic MDF Nylon Carving Cutting
FoxAlien Official

$39.99
$49.99
Sunnytech Low Temperature Stirling Engine Motor Steam Heat Education Model Toy Kit For mechanical skills (LT001)
stirlingtechonline

$99.99
AHS Outdoor Wood Boiler Yearly Maintenance Kit with Water Treatment - ProTech 300 & Test Kit
Alternative Heating & Supplies

$25.34
$34.99
Peachtree Woodworking Supply Bowl Sander Tool Kit w/Dual Bearing Head & Hardwood Handle, 42 Pieces Wood Sander Set, 2 Hook & Loop Sanding Disc Sandpaper Assortment, 1/4 Mandrel Bowl Sander
Peachtree Woodworking Supply Inc

$40.02
$49.99
Becker CAD 12 3D - professional CAD software for 2D + 3D design and modelling - for 3 PCs - 100% compatible with AutoCAD
momox Shop

$54.46
Amana Tool - 46280 CNC 2D & 3D Carving 6.2 Deg Tapered Angle Ball Tip x 1/32 Dia x 1/64
Express Tool Supply
![DreamPlan Home Design and Landscaping Software Free for Windows [PC Download]](https://m.media-amazon.com/images/I/51kvZH2dVLL._SL500_.jpg)
$0.00
DreamPlan Home Design and Landscaping Software Free for Windows [PC Download]
Amazon.com Services LLC
arnoldb
Well-Known Member
- Joined
- Apr 8, 2009
- Messages
- 1,792
- Reaction score
- 12
Martin, Ian, Tel, Kevin & Larry - thank you  ; much appreciated! It's a nice little engine to run ;D Great for office show 'n tell as well!
 I'm getting slowed down a tad with some designs of my own in between :
Regards, Arnold
:big: Not likely mateyou're gonna run out of things to build if you keep this pace up!
Regards, Arnold
ChooChooMike
Well-Known Member
- Joined
- Jan 5, 2008
- Messages
- 863
- Reaction score
- 13
Great !!! Luv all the pictures too  Nice job documenting it all !!
Mike
Mike
- Joined
- Jan 19, 2010
- Messages
- 1,193
- Reaction score
- 41
Wow Arnold, you pump out these projects like there's no tomorrow! Well Done!
I think your cornering the market on model engines in Southern Africa :big:
She is a pretty quick runner, any Idea how fast it's spinning?
Kel
I think your cornering the market on model engines in Southern Africa :big:
She is a pretty quick runner, any Idea how fast it's spinning?
Kel
Maryak
Well-Known Member
- Joined
- Sep 12, 2008
- Messages
- 4,990
- Reaction score
- 77
tel said:Well that was fast - you're gonna run out of things to build if you keep this pace up!
Nice job mate!
Bit like I said to my son. "Don't panic the car yards will not run out of cars."
Seriously Arnold, I silver solder a part, in the time it takes you to make an engine.
Another nice little runner. :bow:
Better late than never. :-[
Best Regards
Bob
arnoldb
Well-Known Member
- Joined
- Apr 8, 2009
- Messages
- 1,792
- Reaction score
- 12
Doc, Mike, Kel & Bob, many thanks!
Kel, I think I just might have the market cornered for Namibia - In RSA there are quite a couple of model builders - it just does not seem that they are very active on the Internet. I really don't know the revs its running at; at some point I'll get a small tacho to measure the speeds for the engines I build. At a rough guess I'd say 2000 to 2500 RPM.
:big: Don't worry Bob; you have much more limited shop access and time than myself - that's my reason, and I'll stick to it
Kind regards, Arnold
Kel, I think I just might have the market cornered for Namibia
:big: Don't worry Bob; you have much more limited shop access and time than myself - that's my reason, and I'll stick to it
Kind regards, Arnold
- Joined
- Jan 3, 2008
- Messages
- 2,085
- Reaction score
- 17
Arnold...not sure how i missed your build thread earlier except that the first half of December was a hectic time. But I am happy it got resurrected again. Great pictures and an exceptional little runner. Thanks for sharing it.
Bill
Bill


![MeshMagic 3D Free 3D Modeling Software [Download]](https://m.media-amazon.com/images/I/B1U+p8ewjGS._SL500_.png)


