Amateur Question: Metric Threading Calculations?

Home Model Engine Machinist Forum

Help Support Home Model Engine Machinist Forum:

This site may earn a commission from merchant affiliate links, including eBay, Amazon, and others.

JAndrew

Well-Known Member
Joined
Aug 9, 2013
Messages
113
Reaction score
21
HMEM,

I've run into a threading calculation that I can't find a straight answer to online. I need to cut 50mmx1.5mm external threads for my ER-40 collet chuck. More info in this thread: http://www.homemodelenginemachinist.com/f13/spindle-threaded-er-40-collet-chuck-atlas-22149/

When I cut the NC threads there was a nice little chart in the Atlas threading manual stating the "depth of single cut" and most importantly the "compound feed" value. I can't seem to find a chart like this anywhere for metric threads!

I can figure out the "single depth of cut" using the equation in the Atlas threading manual but don't know how to proceed from there. It doesn't seem to be listed anywhere online...? Am i missing something? Maybe I'm not supposed to be feeding the compound in at 29.5 degrees for metric threads? I'm pretty sure I am.

I think it could be calculated with some kind of Sin/Cos/Tan equation but I put pencil to paper and don't know if I'm even getting close.

Thanks in advance!
-J.Andrew
 
When I cut the NC threads there was a nice little chart in the Atlas threading manual stating the "depth of single cut" and most importantly the "compound feed" value. I can't seem to find a chart like this anywhere for metric threads!

first of all you are a victim of being spoiled by a really good Lathe manual. And some lack of confidence.
second here is some info.

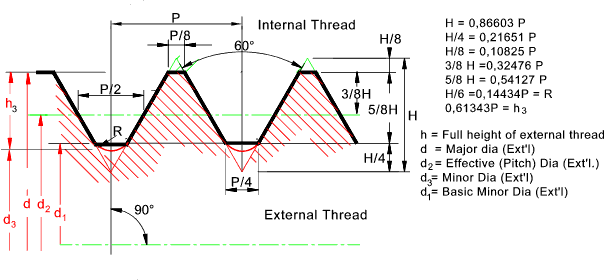
Iso_thread.gif


http://www.machsupport.com/wp-content/uploads/2013/02/Mach3_Threading.pdf


http://metalwebnews.com/machine-tools/ch7.pdf
3rd build a basic library.
Since you are a navy man start with the Navy repairmans manual
http://www.hnsa.org/doc/pdf/machinery-repairman.pdf
Army machine tool manyal TC 9-524
http://metalwebnews.com/machine-tools/fmt.html

and a copy of the machinery handbook.

now that I attempted to confuse you why not use logic and the carts you have since metric form and NC are both 60 degree threads and 1.5 mm pitch is 16.933 almost 17 why not take the data for a 18 tpi and a 16 tpi and find the number in the middle you need should get you close
Better yet do the trig and use the above data to check your work.
And remember it is not the exact number you are looking for use the nut as a gage and machine the thread to fit the nut.

tin
 
Tin,

Thanks for the reply. You provided some viable options that will get me close enough to the correct feed that I can test with the nut as you stated.

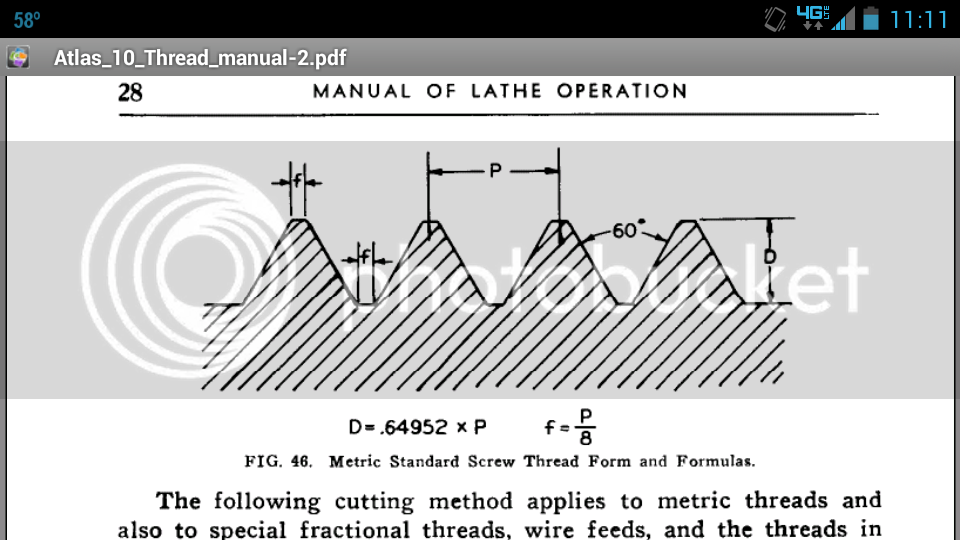
I wish I could say that your image helped but it actually made the waters even muddier. When I try comparing it to the metric threading equation in the Atlas manual it doesn't add up to the same single depth of cut. Here's a screenshot of the Atlas manual equation:
Screenshot_2013-11-17-11-11-31_zps19810a19.png

Comparing your posted picture and running the calculation yields a different result than using this equation. So which one would be right...?

I'll keep looking into this and when I do finally have it "all figured out" I'll put all of this into a spreadsheet that will calculate the "compound feed" required. I'll set it up to include both metric and imperial measurements and share it on HMEM after someone verifies it works alright.

Thanks again. Ever forward.
-J.Andrew
 
The reason the Atlas formula gives a greater depth is that it is not a full form cutter. It shows "F" as the same width whereas Tin's illustration shows the valley rounded, if you projected the two flanks down until the valley was equal to the crest (P/8 ) you would have to cut deeper.

As said use the nut as your gauge
 
http://en.wikipedia.org/wiki/ISO_metric_screw_thread

Well when we talk about metric threads we must define what standard we are referring to.

I expect the chart in the Atlas manual. is ANSI American National Standards institute. / ASME American Society of Mechanical engineers.
the chart I posted Is ISO International Standard Organization

and then there is DIN Deutsches Institut für Normung a German standards association /organization and I think there is or used to be a Japanese manufacturing standard for hardware as well.
So the real question is what standard was the nut you have manufactured to.

I have ran into the problem before telling the difference between a M 10 bolt and a 3/8 16 and often the manufacturer can not tell you witch one was used on a particular item. Yes I get involved in the dirty end of the confusion.

So like I said here the goal is to make the thread it the nut. and it is relativly easy to measure a male /external thread with thread mics thread wires or thread wedges on a mike. but measuring a nut one needs a thread gage for that nut.
my gut feeling is your nut is ISO but you are the one with the part in hand.
And if your root is P/8 insteaad of p/4 there should not be a problem you just need to cut a bit deeper.
Tin
 
JasonB and Tin,

Thanks for the replies. I will start testing the threads with the nut as you both suggested after 0.035" of feed on the compound and start spring cuts then as well. This should be well before the final pitch on either calculation is reached.

I suppose the possible variances that Tin listed might be the reason why I cannot find a chart for metric threads like I mentioned earlier. That kinda throws a wrench into my plan for a spreadsheet.

Thanks again.
-J.Andrew
 
.035" is not enough. If you want to be accurate about threads you must measure them over wires. I just figure infeed unless I have several parts I want to be sure will interchange.

1.5mm*.866 = 1.299mm this is the sharp crest to sharp root thread depth.

Tin's diagram above shows an external thread's sharp root is 7/8H major diamter. So 7/8*1.299 = 1.137mm

This is however from the nominal thread diameter of 50mm in your case. Actual major diameter should be 49.9732-49.968, let's say 49.85. so 50-49.85/2=.075 1.137-.075 = 1.062mm

Now 1.062/cos30° = 1.226mm or .048"

Greg
 
Greg/DieselPilot,

You threw a lot of numbers at me but I think I've got it figured. I meant in my post above that I would START checking the threads with the nut at 0.035" not expect it to be finished or even close to finished. Moreso I'm just nervous about overshooting it and having too much slop after all that work in this part.

I have seen mention of measuring threads "over wires" repeatedly in my searches for answer but don't really know what it means. I'll add this subject to my list of things to learn about (it's a long list) :(

You did hit upon something that I was hoping to figure. If I understood it right, in the last step of your math there you listed: Total Infeed/Cos(Angle of Compound)=The Total Compound Feed. This was the last step of my calculations that I was unsure of! This was the missing puzzle piece for me!

Thanks for the post and running through the calculation. Now I have an idea of what I had right and what I had wrong.

-J.Andrew
 
Have had a 0 - 25mm thread micrometer for years, if you turn a lot of external threads, these are great. Can be had from eBay for reasonable prices. It saves a lot of mucking around trying to measure over wires.

Paul.
 
Swifty,

Thanks I'll search for a picture of one. Having trouble visualizing it.

-J.Andrew
 
Tin,

BTW...I forgot to say thank you for those links to the reference manuals. I've been looking for manuals like those.

Thanks again.

-J.Andrew
 
In USAF tech school we learned using thread mics and the tables from the machineries handbook. We had to cut a male thread then cut a female using the male as a gage.
I do have a thread mic in my home shop but only one I also have thread wedges and wires.
Tin
 
.035" is not enough. If you want to be accurate about threads you must measure them over wires. I just figure infeed unless I have several parts I want to be sure will interchange.

1.5mm*.866 = 1.299mm this is the sharp crest to sharp root thread depth.

Tin's diagram above shows an external thread's sharp root is 7/8H major diamter. So 7/8*1.299 = 1.137mm

This is however from the nominal thread diameter of 50mm in your case. Actual major diameter should be 49.9732-49.968, let's say 49.85. so 50-49.85/2=.075 1.137-.075 = 1.062mm

Now 1.062/cos30° = 1.226mm or .048"

Greg


i did the math using pythagorean theorem and got exactly the same answer. 1.2999...mm around 0.051"
 

Latest posts

Back
Top