A Smaller Steam Engine For A Smaller Boat

Home Model Engine Machinist Forum

Help Support Home Model Engine Machinist Forum:

This site may earn a commission from merchant affiliate links, including eBay, Amazon, and others.
Don't worry Pete, there are known cures for being a cheapskate, and if ever you manage to get cured, it could be the making of you. :rolleyes:

I myself will not buy a new three or four jaw self centering chuck unless I can also buy a set of soft jaws for it.

This little 4" chuck for instance, the soft jaws came to just over 20 UK pounds, and no matter how much runout the chuck has, those little jaws can become the almost perfectly accurate little bit of tooling you ever own.
This one is destined for a CNC rotary table, and another exactly the same for fitting to a dividing head, and yes, you can use soft jaws on your mill RT, just to the same effect as it can be used on the lathe.
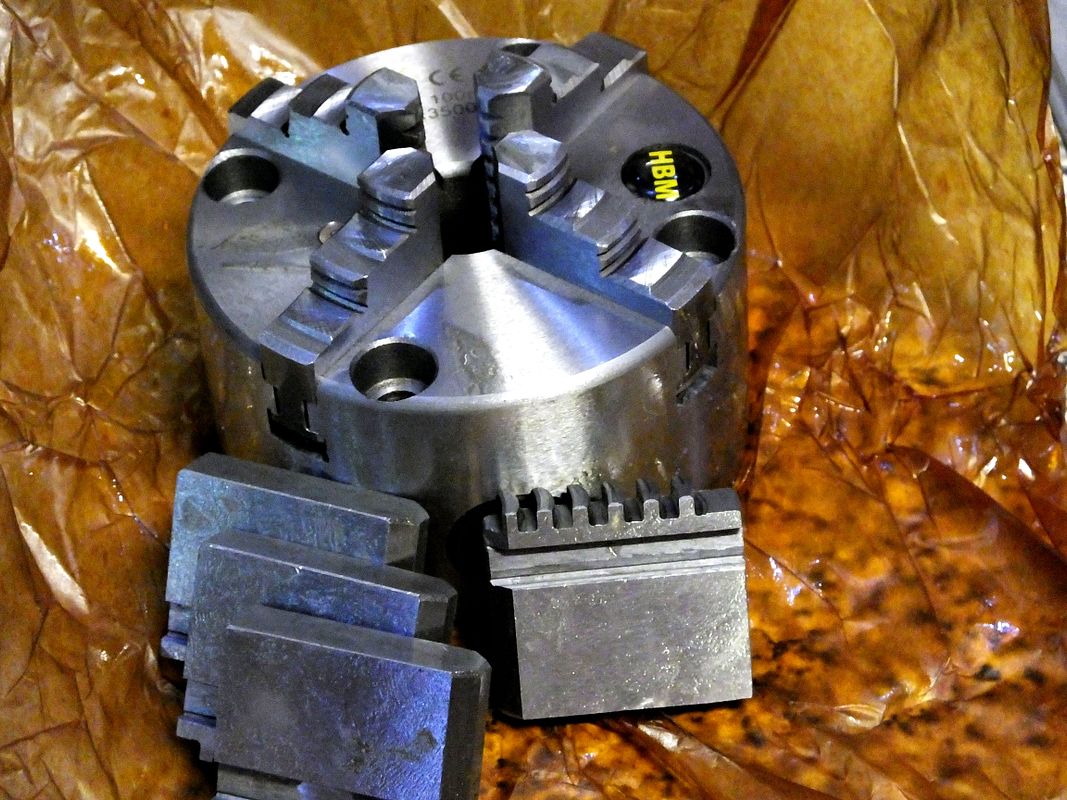
DSCF6318_zpsagpefexc.jpg


Just think of it, no more struggling to hold those little circular parts so that you can work on them, from one to a hundred all identical bits, easily held with astonishing accuracy, all for less than 100 UK pounds, from a small basic lathe or mill, and the chuck can be used in it's own right as normal!!!

This is one bit of tooling that everyone should strive for instead of those here today, gone tomorrow gizmos.

John
 
Last edited:
One of my lathe chucks has 2-piece jaws, so the top pieces can be removed and replaced by aluminum soft jaws. Definitely the way to go for larger diameter thin disks. For small pieces like yours the collet approach works well, but personally I would have used glue on a plate for those covers as being the quickest and easiest
 
I actually had to glue one of the parts, the boss was just a bit smaller so it wouldn't hold when the cutting tool starting removing metal.

A soft jaw chuck sounds fun. Maybe someday.

Here are the covers, all done the holder and glue worked great.

View attachment ImageUploadedByModel Engines1479983545.180984.jpg
View attachment ImageUploadedByModel Engines1479983589.806209.jpg
View attachment ImageUploadedByModel Engines1479983560.985699.jpg
View attachment ImageUploadedByModel Engines1479983636.072518.jpg
View attachment ImageUploadedByModel Engines1479983662.923812.jpg

The cylinders are next so I have started getting a piece of scrap from my quick change tool post project down to size.

View attachment ImageUploadedByModel Engines1479984772.534614.jpg
View attachment ImageUploadedByModel Engines1479984790.070544.jpg

Pete
 
Very nicely done sir! I wonder if there is a way to convert the instructions to English? I can do the metric conversions. Happy Thanksgiving to all members!

Thanks,

Jim in Pa
 
Thanks Jim!
There sure is a way to translate the instructions. I am using Google translate. Just highlight a paragraph of the text on the computer then copy the text and paste it in the box on Google translate. Have the language set to go from German to English and it will do the rest.. It's not perfect but it's good enough to get the idea of what needs to be done.
Pete
 
That is a clean bore
 
Boy, you have a few things haven't seen in years, clecos, core drill and rivet gun. Knocked down hundreds of thousands 1/4 KEs rivets on the Boeing 777 - You're brave to knock down those baby ones with a flat die . . Seen newbies put a die thru the skin when the gun got away from them . . .

Looks good . . .
 
bmac2 - I hope to polish it further but not till the rest of the work on the cylinder is finished.

Foozer - Its all left overs from sheetmetal days at work long ago. I never shot rivets in the 777's we have, but plenty of bucking rivets on the other Boeing products 767's,757's,737's all the way back to 727's. Some KE's but mostly icebox DD's. I didnt haul out the draw clecos but they are around too. That set on the gun was for a universal 470 head rivet so it had a concave surface and wanted to stay on the head. The copper rivets were big 430 round head rivets so they got a bit flattened when they were hit with the gun. I dont have the skill to hold a flush set on a spot like that, your right that would end up in disaster. Long ago a couple of guys at work were shooting rivets near a windshield opening and somehow the guy with the gun and a flush set managed to walk it over to the window hole and with finger still on the trigger fell into the opening and knocked that set into the cheekbone of the poor guy with the bucking bar !!! That had to be the biggest black eye I have ever seen !!!!!

BTW - The workmanship on those aircraft you built is amazing !!!!! How you shot all those rivets so beautifully and without so much as a scuff on the metal is artwork :thumbup:

Pete
 
I have gotten the cylinders down to final size.. I think I should have gotten the outside dimensions first and then punched the hole in the block, it may have been easier. Since the hole was first I had to mill every side down a bit to keep the wall thickness the same. I made a piece of plastic rod to fit in the bore to allow me to place the plastic rod on parallels.. This made it possible to keep the end mill at the same position for each side. Tedious but it worked. Now I have to put a bunch of holes in these blocks, gets a little nerve racking messing with a part with a lot of time invested in it.
Pete
View attachment ImageUploadedByModel Engines1480338030.843114.jpg
View attachment ImageUploadedByModel Engines1480338055.460964.jpg
View attachment ImageUploadedByModel Engines1480338069.595498.jpg
View attachment ImageUploadedByModel Engines1480338084.798263.jpg
View attachment ImageUploadedByModel Engines1480338098.319354.jpg
 
Covers mounted and done with tapping 2-56 holes for awhile I hope. Has anyone used a tapping head? Do they work and can you tap tiny little holes like these with one?
View attachment ImageUploadedByModel Engines1480714781.854937.jpg
View attachment ImageUploadedByModel Engines1480714796.639630.jpg
View attachment ImageUploadedByModel Engines1480714807.372535.jpg
The lower covers get longer screws that will hold the cross head guides and piston rod seal. I'll get those sized up when those parts are done.
Pete
 
I went a few steps ahead to make some visual progress by making the brackets that hold the cylinders in place. Just some flat brass stock trimmed to size and then drilled the holes. I made the holes a little bigger to allow for tweaking the alignment of the cylinders slightly if needed. It wasn't much work but it made a big change in the look of the engine. Before I had a pile of parts, now it looks like I have an engine. Still tons of parts to make, all of them critical and tedious but this is fun to look at.
View attachment ImageUploadedByModel Engines1480893039.060455.jpg
View attachment ImageUploadedByModel Engines1480893061.214065.jpg
View attachment ImageUploadedByModel Engines1480893083.780891.jpg
View attachment ImageUploadedByModel Engines1480893115.167519.jpg
View attachment ImageUploadedByModel Engines1480893127.050048.jpg
View attachment ImageUploadedByModel Engines1480893291.397129.jpg
Pete
 

Attachments

  • ImageUploadedByModel Engines1480893156.535712.jpg
    50.4 KB
Hi Pete,
Looking very good and making good progress.

George.
 
The next parts i decided to make are the valve bodies and their spools. The drawings have been great, but the ports on these valves are really hard to understand. I had to go and have a look at the drawings that fcheslop linked me to earlier in the thread. Those drawings help a lot it's the same engine but the dimensions are all done for a larger version than I am building. Anyway after looking more closely I figured out I drilled one hole in the wrong position. I thought I lost a lot of work, but turns out I can drive on the mistake won't affect the running---whew !! I had to buy a 1.5mm end mill for the channels cut between the ports, that is a tiny bugger.
View attachment ImageUploadedByModel Engines1481676934.590215.jpg
View attachment ImageUploadedByModel Engines1481676948.403338.jpg
View attachment ImageUploadedByModel Engines1481676960.770545.jpg
View attachment ImageUploadedByModel Engines1481676973.425817.jpg
View attachment ImageUploadedByModel Engines1481676986.021587.jpg
View attachment ImageUploadedByModel Engines1481676998.056918.jpg
View attachment ImageUploadedByModel Engines1481677015.453830.jpg
View attachment ImageUploadedByModel Engines1481677027.807890.jpg
View attachment ImageUploadedByModel Engines1481677049.164984.jpg
View attachment ImageUploadedByModel Engines1481677090.144504.jpg
View attachment ImageUploadedByModel Engines1481677100.749942.jpg
View attachment ImageUploadedByModel Engines1481677113.118778.jpg
Pete
 
Working on these little parts is tedious. The plans call for pins that have a threaded end. I went with 2-56 because that tap is in my pile of tools and it's close enough for the metric size called out in the drawings.
I used stainless for the pins and cut threads using the lathe. I don't have a die that size. Getting a good finish on these little parts was hard ( I didn't get what I wanted ), hopefully what I ended up with will work. View attachment ImageUploadedByModel Engines1482098066.237435.jpg
View attachment ImageUploadedByModel Engines1482098079.366831.jpg
View attachment ImageUploadedByModel Engines1482098116.059075.jpg
View attachment ImageUploadedByModel Engines1482098130.420722.jpg
View attachment ImageUploadedByModel Engines1482098143.420637.jpg
 
Covers for the valves is up next. These were simple enough I just changed the decorative edges from a bevel shape to a cut with a bit of a radius. I didn't come up with good way to hold the cover consistently in order to cut the bevel. It was easier to run an endmill down the edge to get a dressed up edge on the cover.
View attachment ImageUploadedByModel Engines1482098605.274720.jpg
View attachment ImageUploadedByModel Engines1482098616.424676.jpg
View attachment ImageUploadedByModel Engines1482098649.493062.jpg
View attachment ImageUploadedByModel Engines1482098664.527913.jpg
 
Pistons and the rods they are mounted on are next. I plan on running graphite tape for 'rings' in the grooves on the pistons, it has worked fine so far on my sternwheeler engines. The only trouble I ran into here was forming the threads on the stainless shafts. I tried using a die for the 4-40 threads, but I had poor results, the die seemed to tear the threads. I ended up cutting the threads on the lathe. View attachment ImageUploadedByModel Engines1482858390.599939.jpg
View attachment ImageUploadedByModel Engines1482858442.769395.jpg
View attachment ImageUploadedByModel Engines1482858471.146944.jpg
View attachment ImageUploadedByModel Engines1482858507.846139.jpg
View attachment ImageUploadedByModel Engines1482858535.723467.jpg
View attachment ImageUploadedByModel Engines1482858556.043527.jpg
 

Latest posts

Back
Top