Slot Milling

Home Model Engine Machinist Forum

Help Support Home Model Engine Machinist Forum:

This site may earn a commission from merchant affiliate links, including eBay, Amazon, and others.

petertha

Well-Known Member
HMEM Supporting Member
Joined
Jun 24, 2010
Messages
2,425
Reaction score
959
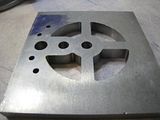
I decided to make myself a stop for my milling vice. I came to realize I dont know much about milling slots. This one is 5/16" dia x 1.5" in about 3/4" thick steel. I didnt have a 2 flute 5/16" endmill but had a 4 flute 'centering' end mill the right size. I figured I would lighten the load to the endmill & remove some material by drilling a series of equally spaced undersized (1/4") holes in the slot area beforehand.

I positioned on one slot end circle, fed 0.050" depth, ran left to right, then down another 0.050", then right to left, back & forth like that. Aside from a bit of interrupted cutting on the holes, it cut ok, but was a pretty crappy finish (not pictured). I chocked this up to:
- maybe the material opening & closing (springing?) with the holes being exposed & intersected (although about 1/2" was contained in clamp jaws)
- maybe the holes were not perfectly centered & it was shifting the endmill


So, for education & experience, I used a next larger 11/32" endmill, again 4 flute centering. Started on one slot end, ran full depth, traversed the slot to the other side. A much better finish (pictured). But I still noticed some waviness & maybe even a slightly enlarged end hole.

Whats the proper procedure milling slots? Staged/progressively larger endmill diameters like a typcal hole drilling & reaming type principle? 2 flute endmill would be better? Maybe pre-holes like I did are a bad idea to begin with as the enmill edges catch the hole & make it drift slightly?Maybe good slot finish can only be accomplished by enlarging the slot width a thou or so to preferentially cut a side a prefertial rotation direction?

2012-11-18_214419.jpg


2012-11-18_214526.jpg


2012-11-18_214504.jpg
 
Last edited:
Without getting too technical when using a 4 flute cutter the rotation of the cutting edge at the front of the cut tends to pull the cutter sideways and the cutting edge behind that cuts a little off the edge of the slot.

When you take the next pass in the opposite direction the tool is pulled the other way so you get a stepped edge and over width hole.

with a 2 flute cutter the back cutting edge is not in contact with metal while the front is cutting so it won't remove metal from teh side of the slot.

You can reduce the problem when using a 4 flute by only cutting in on edirection and taking lighter cuts so the pull is less.

J
 
For that part I would have used a 1/4" drill to make a series of holes roughing out the slot as you did, and then finish with a 2-flute endmill. Drilling is a more efficient way to remove metal than milling, and an advantage is that swarf will fall through on the finish milling.

Probably 90% of my smaller endmills are 2 flute.
 
I decided to make myself a stop for my milling vice. I came to realize I dont know much about milling slots. This one is 5/16" dia x 1.5" in about 3/4" thick steel. I didnt have a 2 flute 5/16" endmill but had a 4 flute 'centering' end mill the right size. I figured I would lighten the load to the endmill & remove some material by drilling a series of equally spaced undersized (1/4") holes in the slot area beforehand.

I positioned on one slot end circle, fed 0.050" depth, ran left to right, then down another 0.050", then right to left, back & forth like that. Aside from a bit of interrupted cutting on the holes, it cut ok, but was a pretty crappy finish (not pictured). I chocked this up to:
- maybe the material opening & closing (springing?) with the holes being exposed & intersected (although about 1/2" was contained in clamp jaws)
- maybe the holes were not perfectly centered & it was shifting the endmill


So, for education & experience, I used a next larger 11/32" endmill, again 4 flute centering. Started on one slot end, ran full depth, traversed the slot to the other side. A much better finish (pictured). But I still noticed some waviness & maybe even a slightly enlarged end hole.

Whats the proper procedure milling slots? Staged/progressively larger endmill diameters like a typcal hole drilling & reaming type principle? 2 flute endmill would be better? Maybe pre-holes like I did are a bad idea to begin with as the enmill edges catch the hole & make it drift slightly?Maybe good slot finish can only be accomplished by enlarging the slot width a thou or so to preferentially cut a side a prefertial rotation direction?

All cutting tools prefer full engagement of the cutting edges. Were it me I'd drill out the major width as you had done, but would probably make some, if not all, blind holes, i.e. leave a thin web to help prevent wandering.
 
I'd rough it out as you did but use a 1/4 inch end mill 2 or 4 flute then clean up the sides with light full depth cuts. If your mill is stiff enough climb cutting gives the best finish.
An end mill rarely gives a slot the size you want, either undersize from wear or oversized if the cutter has runout. Roughing followed by finish cuts will yield the size you need.
 
I've recently has occasion to put some cutouts into 5/8" cold rolled steel plate. I used a CNC machine to do it (the slots are curved) but the problem is roughly the same.
I started with 4 flute HSS end mills, but even at recommended speeds and feeds and with lots of coolant, they were eaten up pretty quickly. A 1/4" 4 flute solid carbide end mill got the job done. At the end of it I couldn't see any wear on the tool. The surface finish was very good. I didn't try to pre-drill out any material, thinking that the tool would probably work better if it was in a clean slot rather than being hammered by discontinuities caused by the drill hole edges.

Jason H.

 
I have done more slotting than I care to remember. You will never get a good finish without walking the end mill side to side and climb milling the inside of the slot at full cut. Small steps will always leave marks as you noticed. You can pre drill the end of the slots so when you move the cutter down into the material it will be less likely to walk. I find it better to not drill a lot of holes in between the ends of the slot. The interrupted cut is harder on the cutter than just taking a full cut of say .025 or .050 deep per pass.
 
I would end drill the slot with a 1/32 undersize drill, using a 1/4 em first pass would be .020 offcenter line at a depth that will work on your machine say .030, at the end of the cut offset .020 the other direction, with additional depth of .030. until full depth is reached. final cut would be full depth of the work offset.011 to come to final size.

Keeping the em full cutting greatly reduces vibration during the cut, and except for the first cut provides clearance for the chip to exit rather than be recut, which kills finish and em sharpness, blow out brush out chips at the end of each pass
 
Thanks everyone. Its apparent more than one way to skin the cat. I have some new 2-flute endmills coming, I'm going to play with different techniques mentioned & report back. I have a few slotting projects to do, so may as well put them to good use.
 

Latest posts

Back
Top