You are using an out of date browser. It may not display this or other websites correctly.
You should upgrade or use an alternative browser.
You should upgrade or use an alternative browser.
PeeWee V4 slow build
- Thread starter Cogsy
- Start date

Help Support Home Model Engine Machinist Forum:
This site may earn a commission from merchant affiliate
links, including eBay, Amazon, and others.
Cogsy
Well-Known Member
Nice. I'm just down the road in Armadale. We always claim it's hotter out here than in the city.
Might have to move to Tasmania - mid summer and the maximum in Hobart today was 20.6! Then there's the snow in winter to look forward to as well. I'm so sick of being hot.
Might have to move to Tasmania - mid summer and the maximum in Hobart today was 20.6! Then there's the snow in winter to look forward to as well. I'm so sick of being hot.
mikemott
Well-Known Member
- Joined
- Oct 24, 2014
- Messages
- 53
- Reaction score
- 67
Al where I am it was -35degrees Celsius yesterday morning not as cold today only -25degrees I am just about to go out to light a fire in the workshop it will be around 0 in there this morning.
I complain about our cold winters but I don't do well in the heat, your tale reminds me of that.
Mike
I complain about our cold winters but I don't do well in the heat, your tale reminds me of that.
Mike
- Joined
- May 27, 2010
- Messages
- 2,999
- Reaction score
- 1,171
Gus - I struggle with heat as well, but high humidity is worse for me. I spent a month in Darwin once and I almost couldn't drink enough to keep up with the sweat I was loosing. I'm guessing Singapore is probably worse.
BTW - it's 10:30 in the morning here right now and already 38.2 degrees. Looks like it'll be warmer than the 41 they predicted.
Hi Cogsy,
I do OK with 2 beer mugs of water in the morning and 2 more in the late afternoon to keep the body system topped up. The only problem is after 1 hour there will be a few pee brake.
The body needs plenty of water to function well. Too much beer not a good idea as it takes out more fluid than the body require.
Take Care
Cogsy---Glad you are okay. It is colder than a witches *** here, high temperature today was -10C and we got about 20 cm of snow. If freight shipping was cheaper I would gather up five or ten tons of that damned white stuff out of my yard and send it to Oz to keep you cooler.---MikeMott--where the heck are you?---Brian
Last edited:
HI Cogsy,
I hear you about being correct but a lot of the machining is fit to another piece. If the bearing diameters fit the bearings I would match the throw diameters to the connecting rod. If the TIR is out on the middle bearing journal I would grind between (centers) our if you can mount it on the bearings and grind the center journal until it cleans up then match a split bushing with it. I had to do this to the Demon V8
I hear you about being correct but a lot of the machining is fit to another piece. If the bearing diameters fit the bearings I would match the throw diameters to the connecting rod. If the TIR is out on the middle bearing journal I would grind between (centers) our if you can mount it on the bearings and grind the center journal until it cleans up then match a split bushing with it. I had to do this to the Demon V8

$190.00
$254.99
Genmitsu CNC 3018-PRO Router Kit GRBL Control 3 Axis Plastic Acrylic PCB PVC Wood Carving Milling Engraving Machine, XYZ Working Area 300x180x45mm
SainSmart Official

$39.99
$49.99
Sunnytech Low Temperature Stirling Engine Motor Steam Heat Education Model Toy Kit For mechanical skills (LT001)
stirlingtechonline

$59.99
Sunnytech Hot Air Stirling Engine Motor Model Educational Toy Electricity Generator Colorful LED (SC001)
stirlingtechonline

$45.99
Sunnytech Mini Hot Air Stirling Engine Motor Model Educational Toy Kits Electricity HA001
stirlingtechonline

$519.19
$699.00
FoxAlien Masuter Pro CNC Router Machine, Upgraded 3-Axis Engraving All-Metal Milling Machine for Wood Acrylic MDF Nylon Carving Cutting
FoxAlien Official
mikemott
Well-Known Member
- Joined
- Oct 24, 2014
- Messages
- 53
- Reaction score
- 67
MikeMott--where the heck are you?---Brian
Brian I am in (sunny) Alberta 50 miles west of Edmonton on the shores of Lake Wabumun
Mike
- Joined
- May 27, 2010
- Messages
- 2,999
- Reaction score
- 1,171
Fly over and fish with Gus. The Met.Station says its 26C but my M.I.C. Gages are reading otherwise. The MIC Hygrometer need to be checked .At 85% and Gus is not feeling the humidity???With the ceiling fan at #1 ( top speed #6) I have having a great time at the PC Desk.
The N.E. Monsoon been cooling down the other 31-----33 C. I have no complaint except that when it rains too much,I catch no fish for dinner. There is a saying in China----------""When Winter comes,Spring is not too far away.


The N.E. Monsoon been cooling down the other 31-----33 C. I have no complaint except that when it rains too much,I catch no fish for dinner. There is a saying in China----------""When Winter comes,Spring is not too far away.


Last edited:
Cogsy
Well-Known Member
I hear you about being correct but a lot of the machining is fit to another piece.
Thanks for the advice Bob. It was the first throw I made the first error on and I'd already missed the diameter on a roughing pass so I knew it'd end up way too small when I cleaned it up properly. I did think very briefly about matching the rods to fit but as the journals are already quite small, I didn't want to take the risk of breaking the crank under power. If I have problems with the next crank I will attempt to save it using your suggestions though.
It's all for the best - I really didn't have a handle on how to machine the crank properly. This second attempt is looking a lot better and has taken less than half the time that the last one did to get it to this point. Weather permitting it should be finished in the next couple of days.
Cogsy
Well-Known Member
The next crankshaft is done - when I say done I mean finished, completed! Well, almost. I still need to trim both ends and do a bit of fettling/polishing, but all the difficult stuff is done. It's not perfect but should be close enough to use. Total runout is less than 3 thou but is concentrated on the rear portion of the shaft, so the only wobble will be the flywheel and that will be hidden inside the bell-housing. This should be ok shouldn't it?
I changed my machining process, the tool I used and modified my fixture from the last attempt. Including building the fixture, I spent 13 hours on the first one before destroying it with the first lathe operation. Including modifying the fixture, this one has 18 hours in it in total.
I really don't want to do that again for a while.
Here's how it turned out so far (with another giant lighter for Swifty).

Now it's on to mounting a motor on the power hacksaw I just got, then making the fixture for making the camshaft. Then making the cam.
Thanks for looking.
I changed my machining process, the tool I used and modified my fixture from the last attempt. Including building the fixture, I spent 13 hours on the first one before destroying it with the first lathe operation. Including modifying the fixture, this one has 18 hours in it in total.
I really don't want to do that again for a while.
Here's how it turned out so far (with another giant lighter for Swifty).

Now it's on to mounting a motor on the power hacksaw I just got, then making the fixture for making the camshaft. Then making the cam.
Thanks for looking.
Last edited:
Swifty
Well-Known Member
Looking great Cogsy, I think that I'm past miniature engines, I like things that are a bit bigger, easier to work on.
Paul.
Paul.
- Joined
- May 27, 2010
- Messages
- 2,999
- Reaction score
- 1,171
Looking great Cogsy, I think that I'm past miniature engines, I like things that are a bit bigger, easier to work on.
Paul.
Hi Paul,
Some engine bigger than the Nemett-Lynx Engine???
Now still studying the V-2 Engine Drawings.
Cogsy
Well-Known Member
Looking great Cogsy, I think that I'm past miniature engines, I like things that are a bit bigger, easier to work on.
Paul.
Thanks Paul. I hadn't really thought of it as miniature, just small really. Now that I give it some thought, I guess it is. I don't think there's any parts that will require me wearing magnification to build though, so it's not really tiny.
I don't think I'd like to build much smaller though - my eyes are getting too old.
Last edited:
Cogsy,
your crankshaft looks good, take your time with the cam, it can be a long process and easy to loose concentration (for me anyway)
your crankshaft looks good, take your time with the cam, it can be a long process and easy to loose concentration (for me anyway)
Cogsy
Well-Known Member
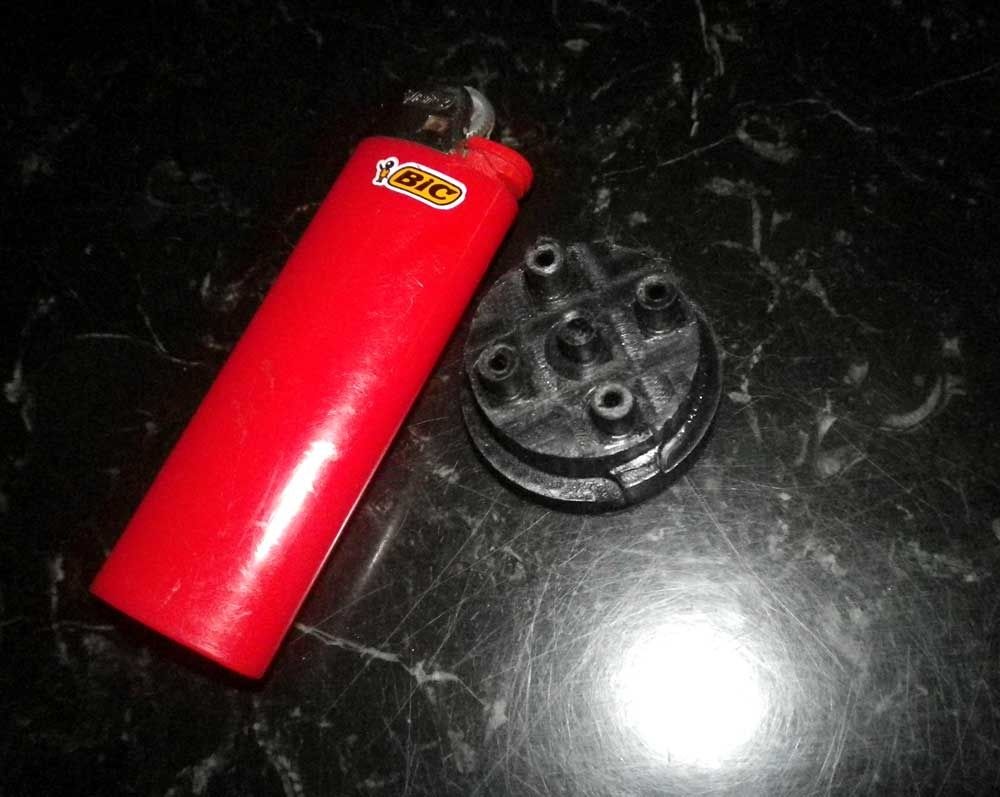
Getting the power hacksaw running is a bit bigger job than I thought, and I haven't had much free time lately, so I haven't started the camshaft yet. I did manage to get a few hours in the shed today, so I worked on something small just to get something done.
I dug up this bearing plastic leftover from a racecar suspension mod years ago, and banged it into the lathe.

Then it was on to the dividing head on the mill and cut a few slots (worked it out yet?).

Then round the leftover chunks, and drill a few holes.

Some hollowing out on the lathe and it now looks somewhat like a dizzy cap.

I'm not sure if I'll use it or use what I learnt making it to make a nicer one. I'll see if I can smooth it out a bit better, possibly a quick pass under a flame? It does look better than this in the flesh but I still want it nicer.

Maybe I used the wrong sort of plastic. Can anyone suggest a plastic that turns easily and finishes nicely?
I dug up this bearing plastic leftover from a racecar suspension mod years ago, and banged it into the lathe.

Then it was on to the dividing head on the mill and cut a few slots (worked it out yet?).

Then round the leftover chunks, and drill a few holes.

Some hollowing out on the lathe and it now looks somewhat like a dizzy cap.

I'm not sure if I'll use it or use what I learnt making it to make a nicer one. I'll see if I can smooth it out a bit better, possibly a quick pass under a flame? It does look better than this in the flesh but I still want it nicer.

Maybe I used the wrong sort of plastic. Can anyone suggest a plastic that turns easily and finishes nicely?
Last edited:
Hi CogsyGetting the power hacksaw running is a bit bigger job than I thought, and I haven't had much free time lately, so I haven't started the camshaft yet. I did manage to get a few hours in the shed today, so I worked on something small just to get something done.
I dug up this bearing plastic leftover from a racecar suspension mod years ago, and banged it into the lathe.
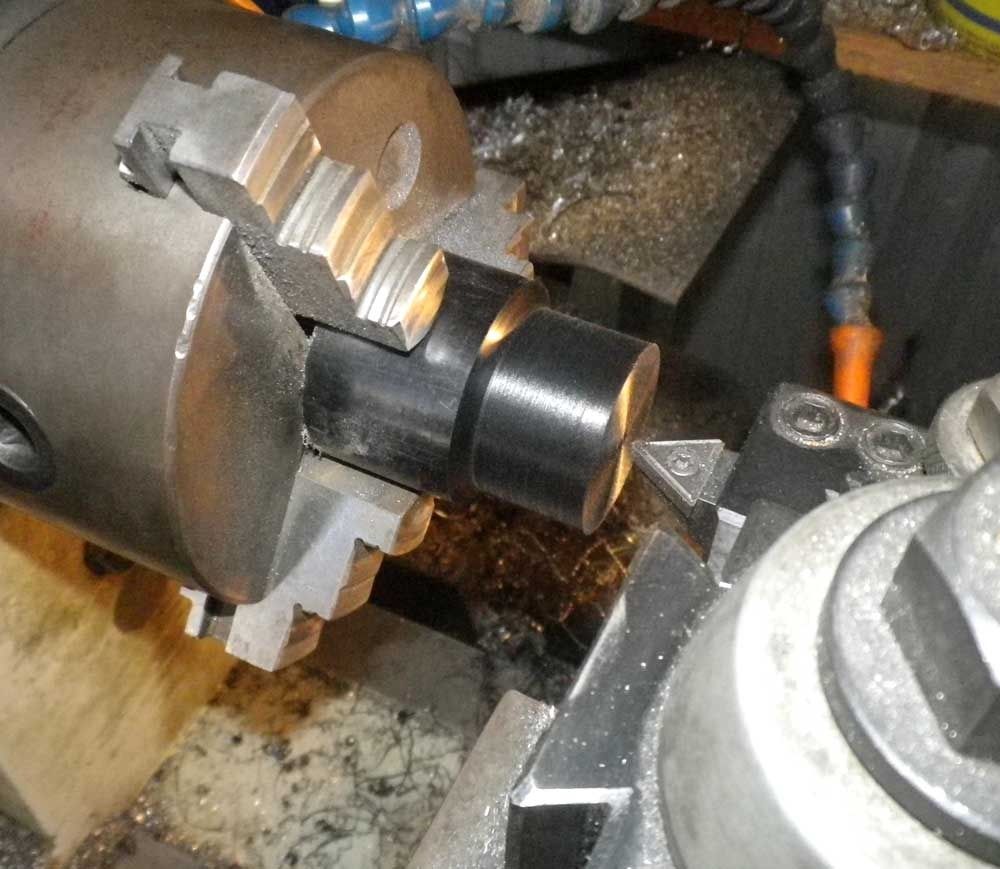
Then it was on to the dividing head on the mill and cut a few slots (worked it out yet?).
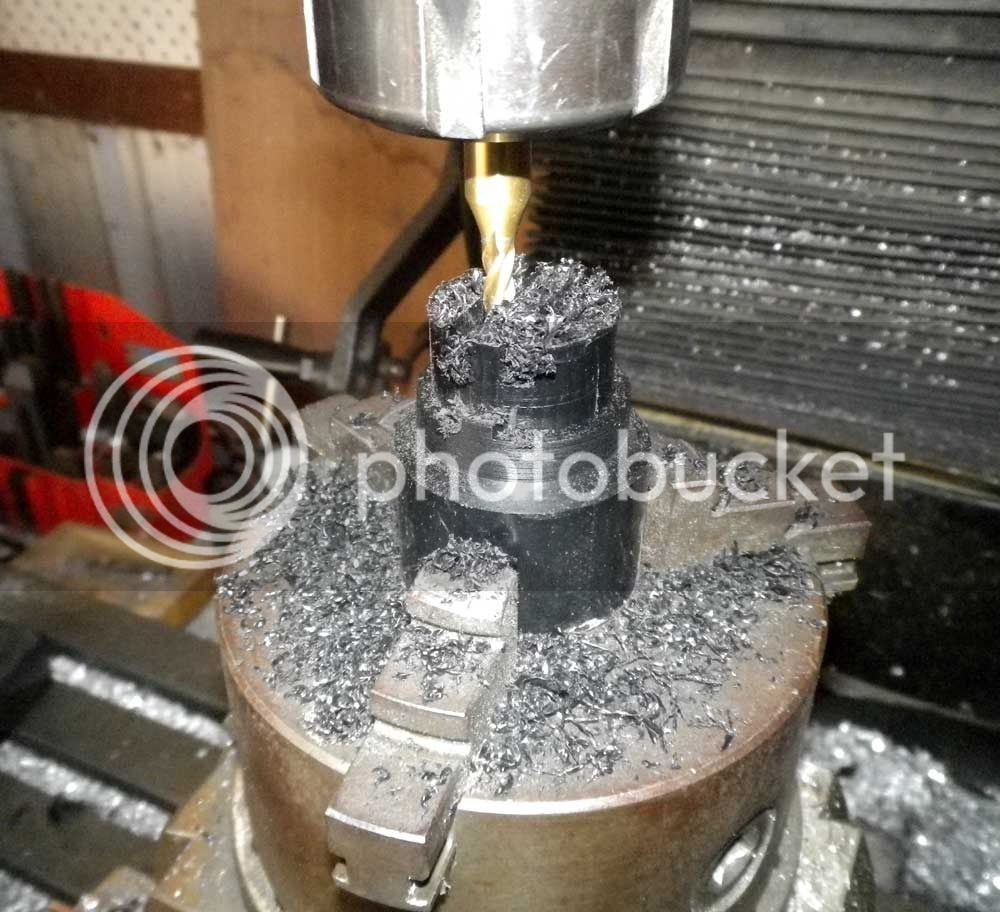
Then round the leftover chunks, and drill a few holes.
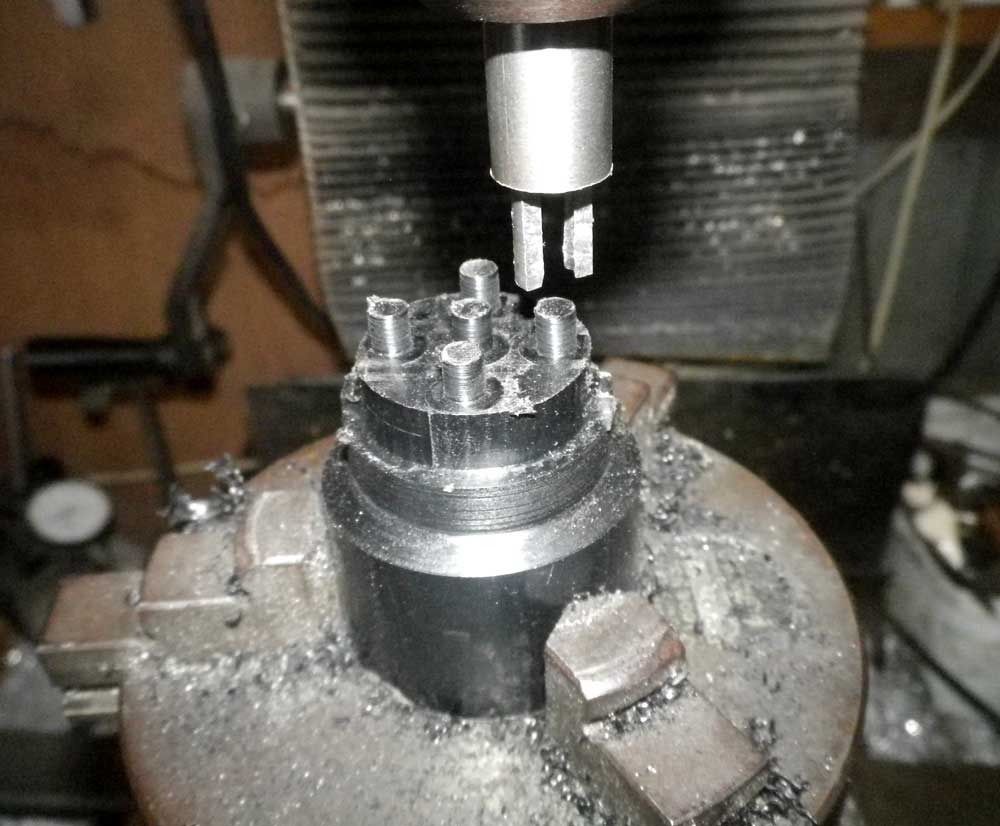
Some hollowing out on the lathe and it now looks somewhat like a dizzy cap.
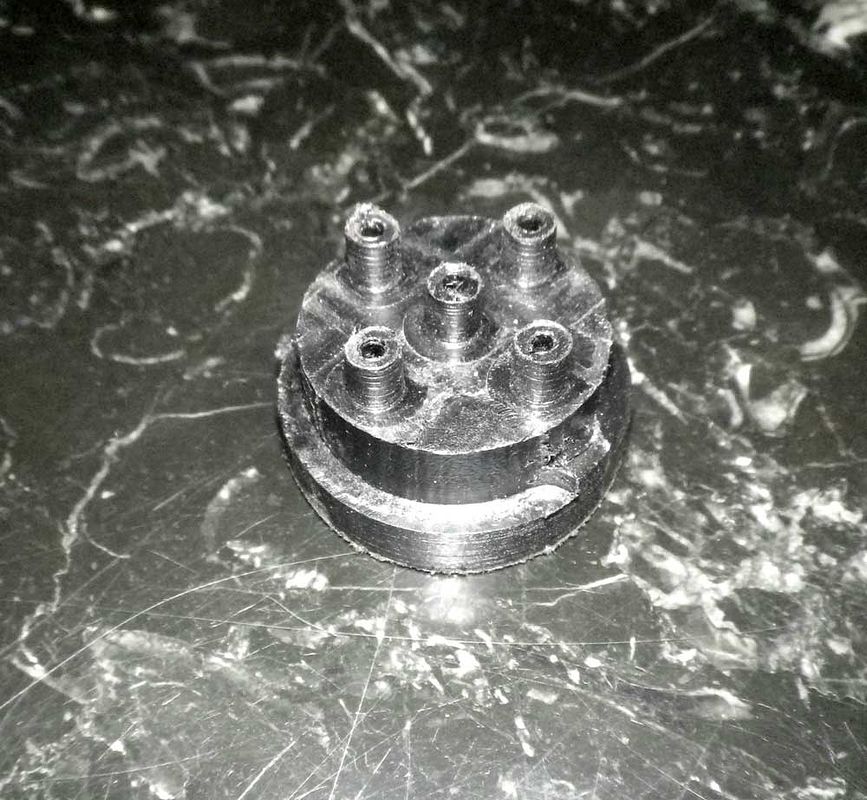
I'm not sure if I'll use it or use what I learnt making it to make a nicer one. I'll see if I can smooth it out a bit better, possibly a quick pass under a flame? It does look better than this in the flesh but I still want it nicer.
Maybe I used the wrong sort of plastic. Can anyone suggest a plastic that turns easily and finishes nicely?
I'm going to purchase mine from SS Machine, fairl play you for making it.
Dave
Swifty
Well-Known Member
Cogsy, you need to use a harder type of plastic, this way you won't get a lot of burrs and it will machine just as easy. Now comes the hard part, I can't recall what type I used at work when poly parts were called for. We did a lot of machining on plastic, but I always changed the specs from what was on the drawing, it may be UHMWPE. http://www.dotmar.com.au/polystone-7000/polystone-7000-uhmwpe-sheet-uhmwpe-rod.html
Or again, it may have been this http://www.dotmar.com.au/acetal.html, I recall that we used both types at some stage.
Paul.
Or again, it may have been this http://www.dotmar.com.au/acetal.html, I recall that we used both types at some stage.
Paul.
Last edited:
Cogsy
Well-Known Member
With the weather set to hit 40 degrees C over the next few days, I figured I'd better sneak a couple more hours in the shed before the heatwave.
I started with a little test of the plastic I made the dizzy cap from. It does file and sand, although it's not the easiest, and once it's flat a quick burst of the mapp gas torch puts an excellent semi gloss, smooth finish on it. So I may use what I have left to make another one, unless I can afford a lump of Delrin (thanks for the tip Swifty).
So instead of spending my precious shed time filing and sanding (I hope to sneak that task inside the house, into the air conditioning) I chucked up a piece of 1" Ali and cleaned it up, hoping to make a distributor body.

Then I turned the outside to finished dimensions.

Next I drilled through for the shaft, bored the body out and made the double stepped pocket for the flanged bearing.

After parting it off I reversed it and lightly gripped it to double step the bearing pocket in the bottom. I used a piece of Monster Energy can to protect the finish but it did get a little marked up.

Once that was done it was onto the mill for making the slot for the hold-down screw and trimming the excess off the hold-down tab.

Here's the completed part with bearings installed and mocked up with the cap and drive gear. Again, like all the parts I seem to post, it still needs touching up and polishing, but I think it's a keeper.

That's all I can do until the weather cools down a bit. Hopefully we'll only have a week or two of the really hot stuff.
I started with a little test of the plastic I made the dizzy cap from. It does file and sand, although it's not the easiest, and once it's flat a quick burst of the mapp gas torch puts an excellent semi gloss, smooth finish on it. So I may use what I have left to make another one, unless I can afford a lump of Delrin (thanks for the tip Swifty).
So instead of spending my precious shed time filing and sanding (I hope to sneak that task inside the house, into the air conditioning) I chucked up a piece of 1" Ali and cleaned it up, hoping to make a distributor body.

Then I turned the outside to finished dimensions.

Next I drilled through for the shaft, bored the body out and made the double stepped pocket for the flanged bearing.

After parting it off I reversed it and lightly gripped it to double step the bearing pocket in the bottom. I used a piece of Monster Energy can to protect the finish but it did get a little marked up.

Once that was done it was onto the mill for making the slot for the hold-down screw and trimming the excess off the hold-down tab.

Here's the completed part with bearings installed and mocked up with the cap and drive gear. Again, like all the parts I seem to post, it still needs touching up and polishing, but I think it's a keeper.

That's all I can do until the weather cools down a bit. Hopefully we'll only have a week or two of the really hot stuff.
Last edited:
Good job Cogsy
- Joined
- May 27, 2010
- Messages
- 2,999
- Reaction score
- 1,171
World smallest distributor cap that money can't buy !!!! Following this thread everyday.
Similar threads
- Replies
- 2
- Views
- 1K


