Offenhauser Inline 4 cylinder, Might Midget Model Engine Build

Home Model Engine Machinist Forum

Help Support Home Model Engine Machinist Forum:

This site may earn a commission from merchant affiliate links, including eBay, Amazon, and others.

Eccentric

Well-Known Member
HMEM Supporting Member
Joined
Dec 29, 2020
Messages
326
Reaction score
747
Location
Southern California
I am starting a new build of the Offenhauser 97 Cubic Inch "Might Midget" Model Engine.
1644629360377.png


The midget motorsports craze of the 1930s and 1940s not only served as a launch pad for many drivers who'd go on to successful racing careers, it also ended up keeping afloat one of the greatest companies in American motorsports history via the Offenhauser midget engine.

Not a year after Fred Offenhauser took over the operations of his former employer, engine builder Harry A. Miller -- which consisted mainly of casting, machining, and selling racing parts, and rebuilding truck engines -- a new business opportunity arose in the summer of 1934. Midget racing had taken the country by storm, offering cheap thrills for spectators and drivers alike in the depths of the Depression. Organizers soon capitalized on the new motorsport's popularity by building dedicated tracks around the country.

One of those promoters, Los Angeles-based Earl Gilmore, grew dismayed with the frequent breakdowns and the unruly nature of the miscellaneous motorcycle, junkyard, and cut-down engines that powered the cars racing at his stadium, so he turned to Offenhauser for help.

"(The unreliable engines) made it difficult to run a show," Gordon Eliot White wrote in Offenhauser: The Legendary Racing Engine and the Men Who Built It. "His patience exhausted, Gilmore sent his manager, David Koetzla, to see Fred Offenhauser about building a real racing engine for the little cars."

Offenhauser didn't have anything on hand at the moment, but he and Leo Goossen, the longtime draftsman for Miller's creations and their successors, pulled up the plans for the 183-cu.in. straight-eight that Miller built for Harry Hartz's 1932 Indianapolis 500-winning entry and decided to cut it in half to make a 97-cu.in. four-cylinder. As White described the engine's construction:
The 183 was, as Millers went, relatively simple, that is, inexpensive. It had two valves per cylinder and was unsupercharged. Using half of the 183's crankshaft left the midget engine with only three main bearings but it seemed to work alright."

In addition, Miller had designed the 183 as essentially two four-cylinder engines sharing a common crankcase so, White conjectured, "Offenhauser could use 183 blocks already on hand, or at least casting patterns for the Hartz engine."

With not much turnaround time, Offenhauser had the first midget engine ready in time for Curly Wetteroth to place it in his midget chassis and subsequently hand the completed car off to Curly Mills for its debut in late September 1934. Mills not only won that race, he also reportedly won his next 16 races.

Though the five total engines he built that first year seems like small potatoes, he charged about $1,100 per engine, roughly the equivalent of $20,000 today. "Fred had a healthy profit margin on them, and with the help of those midget sales, the firm cleared $18,000 for the year," White wrote. "They kept him in business."

Perhaps just as importantly, the midget engine sales -- White counted at least 180 during the time that Offenhauser ran the company -- allowed Offenhauser to develop the larger engines that would go on to dominate Indy and many other forms of motorsport for decades to come.

When Offenhauser decided to retire shortly after the end of World War II, Louis Meyer and Dale Drake bought out his business in 1946 and continued offering the midget engine until about 1974. While it didn't sell in great numbers -- White recorded serial numbers up to 450 or so -- it remained popular and powerful enough to warrant continued development through the decades. Meyer and Drake, in fact, sold most of their midget engines as 102-cu.in. variants and even offered the engine in displacements as large as 111 cubic inches.
---------------------------------------
I have created a 3D Model of the early 97-cu.in. version and am working on a set of plans for this historic engine.
1644629423338.png


I am building what is really a prototype of a never before built model. I am starting as is tradition with the crankcase. The crankcase is split into two halves held together with 4-40 screws hidden behind the crankcase side covers.
I started by squaring up the two work pieces in the mill, then moved them to the CNC router to machine the insides. I also machined what I am calling a "dummy crankshaft". It will allow me to check the bores in the crankcase. The crankshaft is supported at the ends by a pair of ball bearings and in the center by a bronze bush. Its fabrication was a straight forward set of operations on the lathe. I slowly brought the ball bearing surfaces to dimension to insure a tight fit. The front end of the crankshaft will hold the timing pinion and a starter dog. The rear end of the crankshaft will hold the flywheel.
1644629441962.png


Below is a photo of the top and bottom crankcase halves with the internal machining complete.
1644629465315.png


The crankcase is about 4 1/2 inches long and 2 inches wide. If you look closely you can see that the top left and bottom right screw holes have a locating hollow pin surounding the mounting screw that perfectly aligns the two crankcase halves. All of the machining on the inside, including the ball bearing holder surfaces and the locating pins, were performed in one setup. The machining time for the crankcase top was 1 hour and 32 minutes while the machining time for the bottom half was just under 2 hours.
1644629480841.png


When I machined the bottom crankcase half, I took an extra .010" off the top surface to allow for a Teflon (PTFE sheet) gasket. I then assembled the two halves with this gasket material in place. The rest of the crankcase outside machining will be performed with the two halves screwed together like this.
1644629496752.png

1644629507480.png


I plan to machine the front and rear of the crankcase next so I can test fit the dummy crankshaft. I may leave the machining of the sides and bottom of the crankcase for later as it will be easier to work with as a solid block.
 
I just want to know how you tighten those cap screws. I could see how you could get an Allan wrench in there, but it looks like you could barely rotate it. Maybe 1/20 of a turn at a time. It would take an hour to tighten those 10.
 
I just want to know how you tighten those cap screws. I could see how you could get an Allan wrench in there, but it looks like you could barely rotate it. Maybe 1/20 of a turn at a time. It would take an hour to tighten those 10.

A ball end Allen wrench easily tightens them. But you are right, a normal Allen wrench would never work.
 
Any idea what kind of horse power these engines made??

Will be looking forward to progress!
Thanks for taking the time to show your work.

John
The early engines turned out about 100Hp, but as the design was refined the engine was producing 120 HP at 6000 RPM running on alcohol in 1947. By the 1950s, the 102 cubic inch Offy midget was producing 132 HP with carburators, and 143 HP at 8000 RPM with fuel ingection.
 
Machining the Front of the Crankcase
Machining the features at the front of the crankcase requires precision because three gears and their bearings are mounted here. For the gears to mesh correctly they need to be precisely spaced from each other. The position of the front crankshaft bearing holder has already been machined and all of the features on the front need to be precisely placed with respect to it.
Below is an image of the front of the crankcase and it can be seen that there is a lot going on there.
1644710871418.png


Before starting the machining I go to the surface plate and carefully characterized all of the dimension of the assembled crankcase, using the center crankshaft hole as my master datum. I created a detailed sketch with the dimensions of the actual part, the actual size of the crankshaft bearing holder hole and its relation to all sides of the part.
Then the crankcase is mounted in the vise vertically and squared to the axis of the CNC router. I spent an afternoon checking and rechecking the alignment and touching off the part aligning it to all of the axis of the CNC router. I used the dimensioned sketch to check the alignment several ways using them to double check each other. Then I slept on it.
The next morning I rechecked the centering of the crankcase in the CNC vise, then ran the set of programs machining the front. The machining on the front took 25 minutes and the machining of the holes took another 8.
1644710883273.png


Below is a picture of the CAD model and the resulting machining of the front of the crankcase. One of the small bearing has been test fit. There is a second bearing not installed equidistant below the crankshaft.
1644710899269.png


Then I machined the two crankshaft main bearing holders, one is mounted on the front of the crankcase and another on the rear. Below I am test fitting the crankshaft ball bearing for a nice snug fit.
1644710910077.png


Then I turn the features on the outside of the bearing holder and test fit it into the crankcase, again to a nice snug fit.
1644710921447.png


Below are a couple of pictures with the dummy crankshaft installed in the engine with the two main bearing holders supporting it.
1644710933492.png

1644710946401.png


I heave a sigh of relief. The most critical features of the crankcase have been completed and I am satisfied with the precision of alignment on the different sides.
 
A ball end Allen wrench easily tightens them. But you are right, a normal Allen wrench would never work.
I'm wondering how you'll tighten the rod caps during final assembly. I used the stock side access openings for access to the rods' big ends, and so I made sure the openings were wide enough and lined up with the locations of the rod journals. Make sure you've given thought as to how you'll assemble the ring'd pistons into their cylinders and onto their rods and the rods onto the crankshaft. - Terry
 
I'm wondering how you'll tighten the rod caps during final assembly. I used the stock side access openings for access to the rods' big ends, and so I made sure the openings were wide enough and lined up with the locations of the rod journals. Make sure you've given thought as to how you'll assemble the ring'd pistons into their cylinders and onto their rods and the rods onto the crankshaft. - Terry

Terry,

My engine is simpler than your Offy. You had your crankshaft running on 5 bearings, three bronze bushings between each of the four cylinders, 2 ball bearings pressed into each end of the crankcase, and another in the front cover. Your bronze bushings were mounted to the crankcase bottom half. Once you installed the crankshaft into these bronze bushings, it is difficult to access the rod cap screws. Thus the access through the ports in the side of the crankcase. That is the way the real Offy is assembled, by the way, through those side access ports (I can't imagine).

I am using three crankshaft bearings, 2 ball bearings in ball bearing holders at each end of the crankcase and a single bronze bushing in the middle of the crankshaft. My split bronze bushing is secured with a bearing cap screwed to the crankcase top half. Since the crankshaft is secured to the top crankcase half, I will have access to the rod caps. My crankcase bottom half is like a sump and will be installed after the connecting rod caps are secured.

Below is an image of the engine upside down showing these features. (the center bronze bush is missing from the model)
1644883571569.png


Thanks for the guidance, I have designed things in that past that have not been manufactuarable for the very reason you state, "how the heck am I supposed to get a tool in here?" or "how is this parts supposed to slide past that part?" That is why I am classifying this as a "prototype" build, there is a good chance I will have to scrap and redesign parts before I am through. I appreciate your eagle eye.

Regards to an earlier comment of yours "to not forget about the gaskets", per your suggestion, I have gone back and actually included the gaskets in the 3D model as parts. In the image above one cylinder sleeve is removed and I have pointed to the .020" thick head gasket. I decided not to leave it to the fabrication step to make the allowance for the gaskets.

Thanks for your attention,

Greg
 
Front Cover -

The front cover seals the front of the crankcase and houses the oil pump and three gears, the crankshaft pinion, the oil pump gear and the valve timing drive gear. The features in the front cover hold two ball bearings for the gears need to precisely align with their partner bearings on the front of the crankcase.
1645059558675.png


Machining the front cover has several challenges, the foremost is aligning features on both the front and back sides. A secondary challenge is the tight quarters and fine details on the front face of the cover. The mating surface of the crankcase was machined in one setup, so the bearing holding features and the mounting holes for the front cover are well aligned. I will do the same on the front cover, machine the bearing features and the mounting holes in the back in one set up. Then I will load a piece of fixture stock in the mill, and machine holes matching the eight mounting screw holes in the front cover. I will then screw the front cover front side up with four of the screws, and machine as much as I can. Then I will put in the other four screw, remove the first set of four screws, and machine the balance of the front cover.

Below, the inside of the front cover is being machined. This is a straight forward set of operations because they are essentially a copy of the set performed on the front of the crankcase.
1645059576529.png


Below is an image of the finished inside machining.
1645059595569.png


I then use a band saw to remove most of the material on the front side of the cover, following up on the mill to provide an accurate surface to start with on the CNC router.
1645059606688.png


A fixture block is loaded into the CNC router vise. I perform a finishing operation on the top to flatten it and provide a known surface with respect to the CNC Z axis. Then the six mounting holes are machined and tapped. One of the holes was used as the X and Y axis zero set points and the top surface becomes the Z axis zero set point.
1645059628722.png


Below the roughing pass begins
1645059645995.png


I used a 1/4 flat end mill for initial roughing and machining of the horizontal flat surfaces. Then I used a 3/16ths ball end mill to machine the curved outer surfaces, and finally a 1/8 inch ball end mill to create the fillets around all of the features. I either used a dull 1/8th inch ball end mill, or did not properly match the spindle speed with the surface speed, but I was disappointed in the finish of the radius operation. Oh, and I hit the screw holes with a 3/16th flat end mill to create the counter sinks.
1645059662860.png


Below is the front cover mounted on the front of the engine.

1645059678410.png

1645059690415.png

1645059747464.png
 
Cylinder Block

The cylinder block forms the water jacket around the cylinder sleeves. It is a block of aluminum with most of the material machined away, then a lot of holes are drilled in addition to the bores for the cylinder sleeves. There are two side covers that mount to the sides of the block sealing the water jacket.

The block is shown in blue in the image below:
1645320414326.png


It was going to take two hours on the CNC Router to machine out all of the aluminum from the inside of the block, so I decided to use a drill bit and an end mill on the manual mill. I started by drilling 1/4" pilot holes, then followed up with a 7/16th drill bit to remove the majority of the material. Then an end mill squared up the pocket. Finally I hit the corners on both sides with a 1/16th end mill for the small radii needed there to clear some screw heads.
1645320441254.png


On the CNC router, I machined as much as I could from the top of the block including the cylinder sleeve bores, then drilled the few holes on the bottom of the block by hand. I made the block with an extra .010" of material on one side for some reason, and then touched off the bottom holes and the top holes on different sides of the block by accident. So the holes on the bottom are offset to one side by .010" Fortunately I have not drilled the matching holes in the crankcase and can offset them by the same amount and no harm no foul.

An interesting feature of the Offy block is the taper in the sides. Instead of machining a custom fixture I simply clamped the block in the mill vise with a spacer so I could machine off the required .065" from the bottom of the block and taper it to 0.0" at the top. I used an indicator to insure my clamping was correct.
1645320541418.png


Then I ran an end mill around the edge.
1645320571923.png


Below the block sits on the crankcase in its intended position:
1645320611642.png


The block weighs just a wiff of what the squared up work piece did. I still have to drill and tap 64 holes for the 0-80 screws that secure the side covers. I will machine and drill the side covers, then match drill the holes in the block to insure good alignment. The side covers need to be flush with all sides of the block.
 
Your making amazing progress. As a matter of interest what CNC router do you have? I just took delivery of a Onefinity. I really have missed my larger CNC and I'm hoping this will fill the void a bit. Looks good so far.
 
As a matter of interest what CNC router do you have?

I originally built a CNC router using a Dewalt Router motor to machine wood for madolins and gutairs. It is a gantry type and I copied a few designs I found on the internet. It worked really well and I enjoyed it for the complexity of projects I could tackle. I used a PC along with PC power supplies for each axis. The software consisted of a DOS program called TurboCNC and VisualMill to create the tool paths. I did invest in good linear slides and ball screws, but the rest of the machine was build out of MDF--not real rigid, but accurate if light cuts are taken.

Later, I rebuilt the Z axis and upgraded the spindle to a water cooled variety designed for machining metal. Also I went to hybrid stepper motors from Leadshine (can not say enough great things about them) and moved to LinuxCNC. The machine now does a good job with aluminum and can handle steel if I take small cuts. A 1/4" end mill is the largest I can reasonably use, if I go larger you can see artifacts in the machining due to vibration and resonances of the machine and there is no real advantage. As with any milling machine, I wish I had more Zed height, I only have a few inches.

I am wary to recommend CNC to my machinist friends becasue of the amount of computer work that is required. I come from an engineering background and I enjoy working on the computer, designing parts and creating tool paths. Creating a one off part on a CNC requires much more time sitting in front of a computer than in the workshop. That is one thing I like about model engine building, there is a variety of machining skills required; the CNC can help, but I still spend more time at the lathe and mill than the CNC router.

Since you come from a CNC background and know what you are getting into, I am sure you will enjoy the Onefinity CNC.
 
Cylinder Head

The cylinder head is one of the most complex parts in the engine. It has coolant passages, oil passages, not to mention the intake and exhaust ports. The camboxes mount to the head and so its dimensions dictate how well the timing gears mesh.
1645492414877.png


I start with machining the internal features including the coolant passages and the coolant cavities. The coolant passages connect the coolant water pipe flanges with the internal coolant cavities. The coolant passages are drilled the long way through the head, they are .150" in diameter, so drilling the 2" from both ends to meet in the middle is relatively easy.
1645492428183.png


The coolant cavities are machined into the head with a 1/4" roughing end mill.
1645492436857.png


Three small matching cavities covers are made from 1/8" aluminum sheet.
1645492482212.png


The caps are secured in place with high temperature structural adhesive.
1645492824605.png


I set the adhesive aside to cure for a day and then fly cut the head top to final dimension.
1645492512793.png


I am happy with the way the sealed coolant cavities turned out. No one will know about them but us.
1645492525095.png


I drill the four spark plug holes.
1645492575923.png


Then I begin machining the bottom of the head.
1645492691929.png


Once the conical combustion changers are machined on the CNC router, it is back to the manual mill to spot drill, drill and tap the holes on the bottom side of the head.
1645492710714.png


Oppps ...... I hit my picture limit, the rest of the post can be found here:
Offy Cylinder Head
 
Cylinder Head - Part 2

In this second installment describing the machining of the head, I show the steps to machine the two non-vertical/horizontal surfaces--the face the intake and exhaust manifolds mount to, and the face the cambox mounts to.

First I use the CNC router to machine the two bevel surfaces on each side. Why not use the router to complete the machining on these beveled sides? I couldn't, given the limitations of my little CNC router. The work piece is 4.125" long and the vise on the CNC router can only open to 4". My mill vise is larger, but I can't use it on the CNC router because it is too tall and I don't have enough Zed clearance. I reasoned that this part needs to be clamped from the ends since these are the only two vertical surfaces the vise can bear against. I looked at a couple of fixtures, but the rotational forces of clamping the part would result in an unreliable work holding situation.

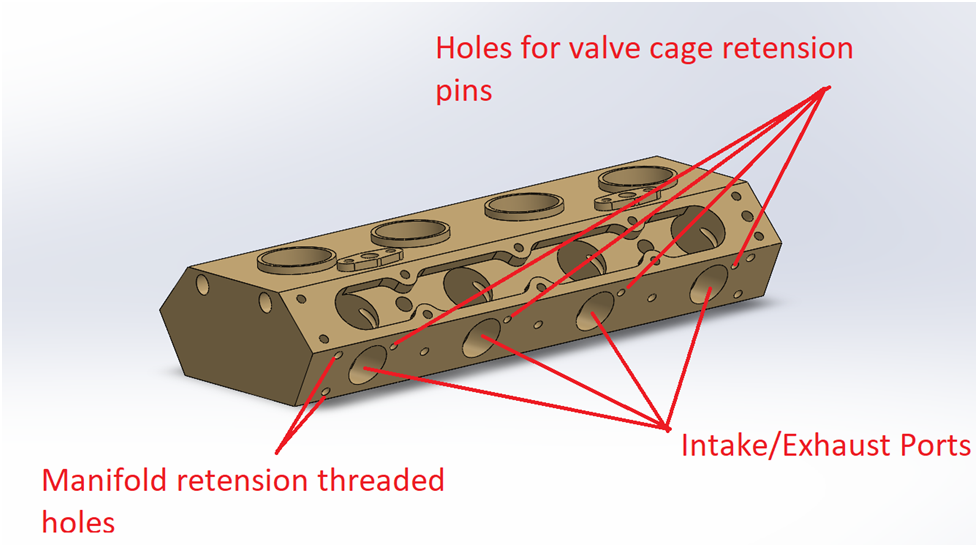
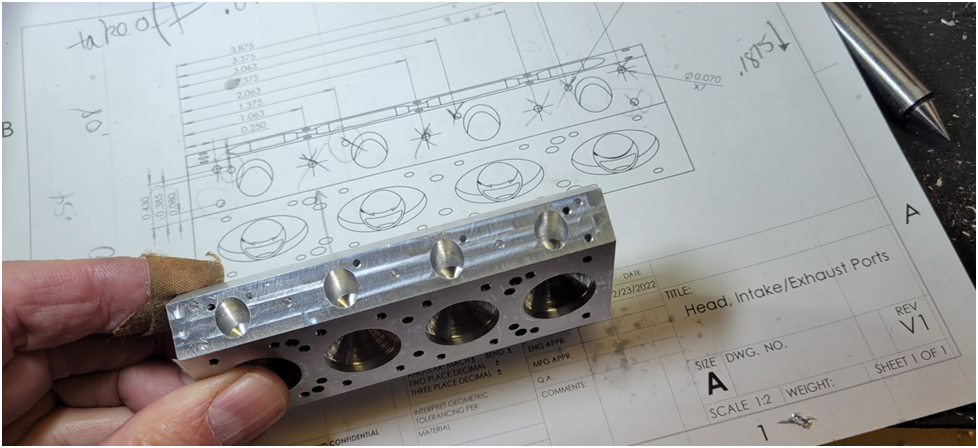
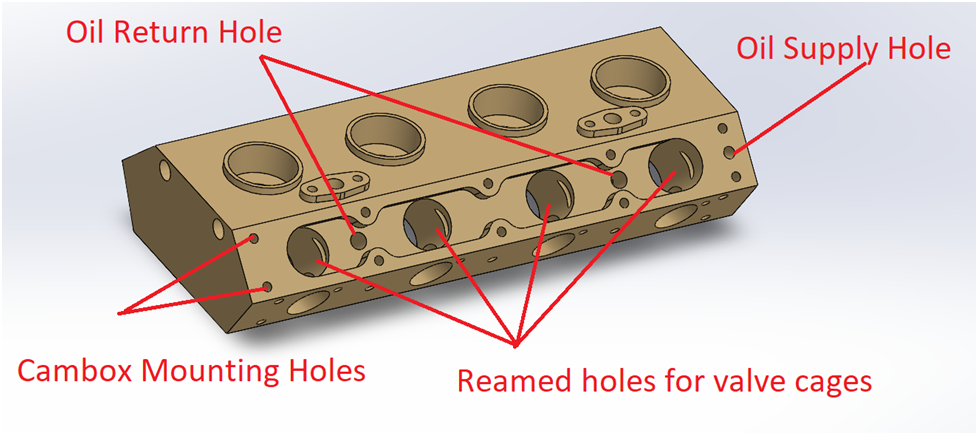
I can probably manual mill the features faster anyway. I decide to start with the simpler face first, the manifold mounting surfaces. The four port holes were machined in an earlier step, so already exist. There are only the 7 threaded holes for mounting the exhaust/intake manifolds and the 4 holes for the pins securing the valve cages. These are shown below.

This image has an empty alt attribute; its file name is image-6.png


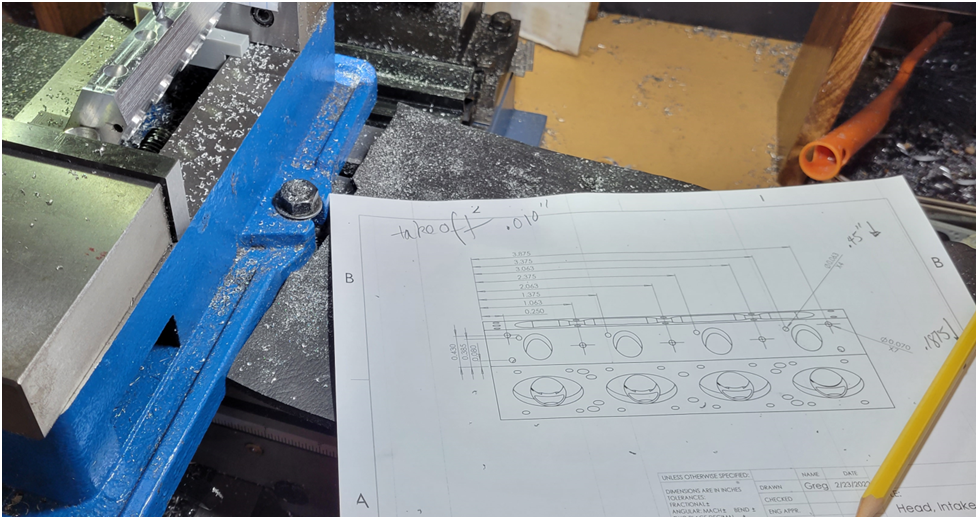
I have been creating the drawings for the parts as I build and machine them; this way I can find issues with the print. I find a couple of missing dimensions and hole callouts.

This image has an empty alt attribute; its file name is image-7.png


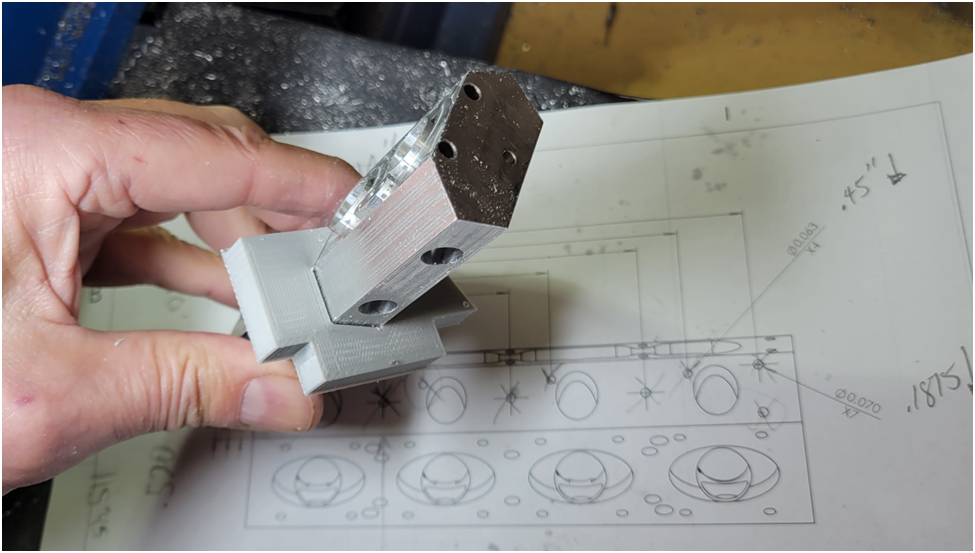
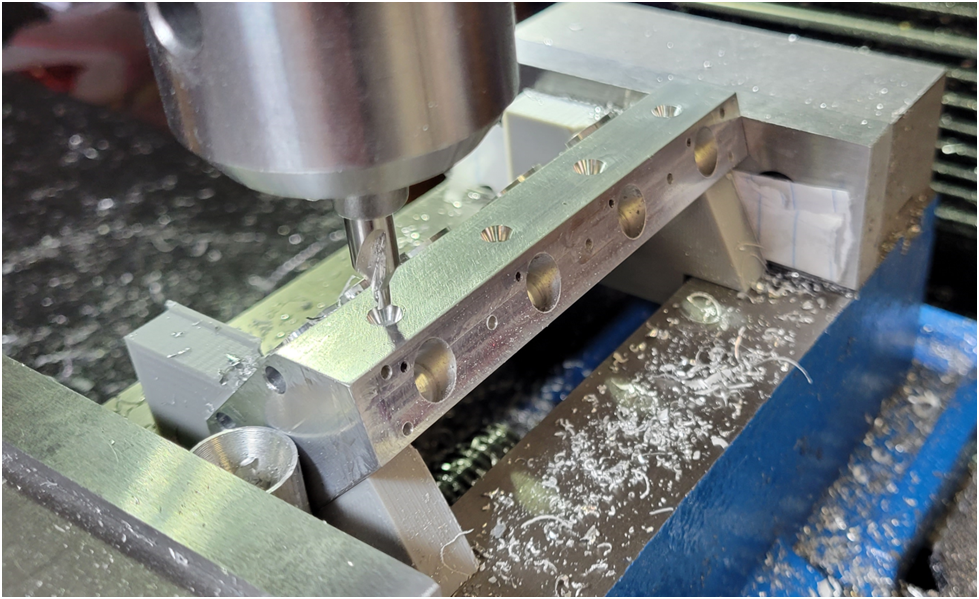
There is a fixture required to align the beveled surface I am working on. I decide to 3D print it. the fixture carries light loads during the milling operation and no clamping force. Designing and printing the fixture part is much quicker than using a piece of aluminum for a one off fixture.

This image has an empty alt attribute; its file name is image-8.png


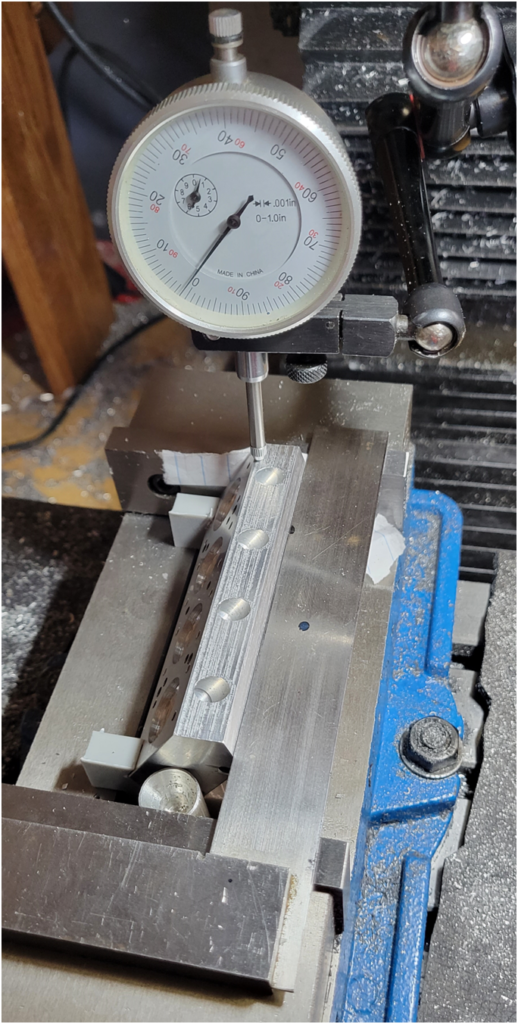
I do not rely on the plastic fixture alone. An indicator is used to verify and tweak the clamping to insure the surface is properly aligned with the mill table. You can see that a sheet of notebook paper was used as a shim to bring the part in perfect alignment. I use a square to confirm perpendicularity and an aluminum rod on the moveable vise jaw to insure only the primary face of the vise jaw is aligning the part.

As mentioned before the four large port holes were drilled in an earlier operation.

This image has an empty alt attribute; its file name is image-9-518x1024.png


Once the part is secure in the vise and aligned to the mill, spot drilling, drilling and tapping the holes is routine.

This image has an empty alt attribute; its file name is image-10.png


Machining the cambox face is more complex because in addition to drilling and tapping holes, I need to drill and ream the large holes for the valve cages, then machine the oil collection channel.

This image has an empty alt attribute; its file name is image-11.png


All of the machining on the head prior to today's operations used the center of the part as the origin. This way any variation in the outside dimensions of the part will be spread evenly on all sides. If you look at the print in the picture above, you can see all the dimensions are referenced to edges. This could result in slight miss alignment as tolerances would be biased to one side. I realized this before I machined the Cambox surface and created the print using the center of the surface as the datum. I doesn't really matter what is used as a datum as long as the machining operation on all of the faces use the same ones.

Below I spot drill the four holes for the valve cages.

This image has an empty alt attribute; its file name is image-12.png


The rest of the post can be found here:
Offy Cylinder Head - part 2
 
I am wary to recommend CNC to my machinist friends becasue of the amount of computer work that is required. I come from an engineering background and I enjoy working on the computer, designing parts and creating tool paths. Creating a one off part on a CNC requires much more time sitting in front of a computer than in the workshop. That is one thing I like about model engine building, there is a variety of machining skills required; the CNC can help, but I still spend more time at the lathe and mill than the CNC router.

This is excellent CNC advice for someone thinking of getting into it. When you see pictures/video of a CNC cutting parts you think what a great time saver it will be. As you say, if you enjoy computer work then it is fun. If you think you are going to be able to make parts a lot easier then....well....maybe. There is something fascinating about watching the CNC cut a part. Buy you will spend a lot of time on the computer before you make it into the shop and you will be very frustrated when you spend all that time and then break a cutter the first time it hits the block of metal.

But I am a real fan of CNC. Sometimes a break from the shop and onto the computer is a good thing.

Your work is very impressive and I really like this engine.

Rick
 
Last edited:
I originally built a CNC router using a Dewalt Router motor to machine wood for madolins and gutairs. It is a gantry type and I copied a few designs I found on the internet. It worked really well and I enjoyed it for the complexity of projects I could tackle. I used a PC along with PC power supplies for each axis. The software consisted of a DOS program called TurboCNC and VisualMill to create the tool paths. I did invest in good linear slides and ball screws, but the rest of the machine was build out of MDF--not real rigid, but accurate if light cuts are taken.

Later, I rebuilt the Z axis and upgraded the spindle to a water cooled variety designed for machining metal. Also I went to hybrid stepper motors from Leadshine (can not say enough great things about them) and moved to LinuxCNC. The machine now does a good job with aluminum and can handle steel if I take small cuts. A 1/4" end mill is the largest I can reasonably use, if I go larger you can see artifacts in the machining due to vibration and resonances of the machine and there is no real advantage. As with any milling machine, I wish I had more Zed height, I only have a few inches.

I am wary to recommend CNC to my machinist friends becasue of the amount of computer work that is required. I come from an engineering background and I enjoy working on the computer, designing parts and creating tool paths. Creating a one off part on a CNC requires much more time sitting in front of a computer than in the workshop. That is one thing I like about model engine building, there is a variety of machining skills required; the CNC can help, but I still spend more time at the lathe and mill than the CNC router.

Since you come from a CNC background and know what you are getting into, I am sure you will enjoy the Onefinity CNC.
Cheers Greg, Thank you so much for the info. I now have the Onefinity up and running. At the moment I am getting to grips with Fusion CAM. I've been looking to get a small CNC for a while now and the Onefinity looked like a very rigid setup.
I just could not get my head around machining some of the complex shapes on my little Honda project that I wanted to look like stock castings.
👍
 
Last edited:

Latest posts

Back
Top