Having the correct Tool

Home Model Engine Machinist Forum

Help Support Home Model Engine Machinist Forum:

This site may earn a commission from merchant affiliate links, including eBay, Amazon, and others.

tmuir

Well-Known Member
Joined
Oct 30, 2007
Messages
888
Reaction score
11
The other day my stand finally arrive for my dial indicator so I used it last night to set up my tools rather than just going by eye lining up the cutting edge with the point on my dead centre on my lathe.
By eye I was probably out by between 0.3 to 0.5mm off centre with my tools and with the DI I managed to get it virtually spot on. The difference this made for my parting tool was amazing and I now get a much better finish with my regular cutting tools.

I always knew my tools would work better if properly positioned but I was amazed by how much a difference it makes.

If there are any other newbies out there like me that don't have a dial indicator yet I strongly suggest getting one.

Now to save up and get my quick change tool holders. :)
 
HI
Just running a facing cut should give you a quick visual as to how close to center height you are.
If that fails face off a lump of bar and use the tool to scrive a line across the work rotate the work 120 degrees and scrive again. Once you have done that three times you should be able to work out from the lines and how they intersect what your tool heights like.

Cheers Kevin
 
The ultra quick way to set height is to put a rule between the tool tip and the O/D of the bar. If top leans towards you add packing and vicky verky Regards Ian.
 
How abouts did you use the indicator to set the tool height? I normally just face up the end of a piece of bar and measure the nib left in the centre to get the height.

Alan

 
It was fiddly bit I put a dead centre in my tailstock and set the DI on my lathe bed and zeroed it off on the very tip of the dead centre and then moved the tailstock out of the way and wound the tip of my tool under the DI, saw it was reading low so repacked till I got the height right.

Measuring the bump left when you face off is a very simple way to do it but no good for setting the height on a parting off tool.
 
Tony
Listen to Ian...LOL. The 6 inch rule method is a sweet down and dirty little trick that will give you an instant visual reference. It's amazing accurate as well. I tend to run my cut off tool just the least smidgen (southern technical term) below the center line so I tilt the blade ever so slightly toward the front of the lathe to set it up.

The facing method is also a very handy way to get the edge aligned, as well as exactly perpendicular. I just place the blade flat against the faced end to make sure it's square to the work piece and then position it for the cut.

We need to develop a way to extract all these little tricks from the brains of the old hands, without doing damage. Sort of a like catch and release program...(grin)

Steve
 
The 6 inch rule trick works every bit as well to find top dead center of a round workpiece on your drillpress.....Lots of times thats plenty accurate enough to do the job at hand.
 
Cedge said:
We need to develop a way to extract all these little tricks from the brains of the old hands, without doing damage. Sort of a like catch and release program...(grin)

Steve

Sounds like you come under Bogstandards "I want!" category! ;)

I normally use the 150mm steel rule trick when setting up a parting tool (thats the metric version of the same concept)

Make sure you use a quality steel rule though and not the bent old one thats been left out in the shed for years that you use as a paint scraper! ;)
 
Alan
Yeah... "I want" to know everything these old guys know. Unfortunately my head would probably explode before everything was filed away. Just think of the memory space required to file just the Marv Klotz stuff , alone....LOL

Steve
 
Less of the 'old' guys. Mature is a much better phrase.
But on the other hand, I have been called worse.

John

 
Some of you may have seen the SouthBend videos. A link was posted in another thread, but here it is again:

http://www.shinyobjectdesign.com/staff/paul/sbvideo/

If you watch the one on single point tools, they have an excellent diagram on the effect of your tool height relative to center. If you have your tool below center, it wants to suck the tool into the work. Almost makes me think of climb milling and wondering how much might happen here? If you have your tool above center, it wants to push the tool away from the work and you may not be right on the cutting edge but instead a little below it.

Good stuff and good on you for reporting the effect on your surface finish of proper alignment!

Cheers,

BW

PS As many of you know, I am a gadget nut. I use a neat little gadget that goes against the workpiece and rests atop the cutting edge. It has a bubble level on top. Got mine from Brownells, but I've seen similar elsewhere. A lot of folks make a little gage that sits on the saddle and you can just dial your tool up until it hits the top of that gage.
 
Alphawolf45 said:
The 6 inch rule trick works every bit as well to find top dead center of a round workpiece on your drillpress.....Lots of times thats plenty accurate enough to do the job at hand.
I can't believe I never thought of that :eek:
 
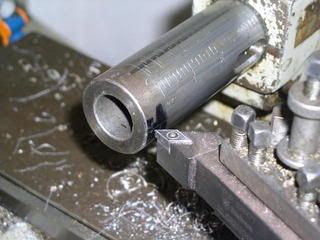
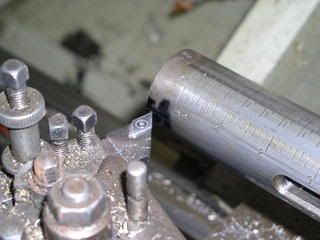
I check centre height by scribing a line on the barrel of the tailstock on some permanent marker with a tool which has been checked on centre by a facing cut which leaves no 'pip'.

This is quick and easy and works if you are on some hex stock and can't use the ruler method.

Picture010.jpg

Picture011.jpg


I hope these pictures tells it better than I can say it!

Al
 
I could never see the sense of QCTPs except in an industrial environment. When I was starting out the tool holders were expensive and I couldn't see myself making a career out of making holders. Prices have decreased so some day I may have to reconsider this.

I use square tool blocks (holds 4 tools) and triangular blocks (holds 3 tools) and shim the tools. Because I have about eight of these blocks it's very rare that a tool has to be reshimmed. All these blocks have built-in wrenches so it's a ten second job to switch blocks when a different tool is needed. All the blocks can be rotated so it's trivial to bring any tool to bear at whatever angle of attack is needed.

I made a small gage that's nothing more than a block of steel with height equal to the height of the lathe centerline above the top of the compound. Push this up against the tool and run your fingernail across the juxtaposed block and tool tip. Even very minute height differences can be easily detected - your fingertips are exquisitely sensitive to such differences.
 
We all find our personal favorite ways.

My Grizzly lathe tool post was designed to center a 10MM tool.
All of my tools are 3/8" That's a .019" difference.
I made a .019" thick shim the size and shape that fits under
the 4 sided tool post.

No adjustments needed.

Rick
 
mklotz said:
I could never see the sense of QCTPs except in an industrial environment. When I was starting out the tool holders were expensive and I couldn't see myself making a career out of making holders. Prices have decreased so some day I may have to reconsider this.

I use square tool blocks (holds 4 tools) and triangular blocks (holds 3 tools) and shim the tools. Because I have about eight of these blocks it's very rare that a tool has to be reshimmed. All these blocks have built-in wrenches so it's a ten second job to switch blocks when a different tool is needed. All the blocks can be rotated so it's trivial to bring any tool to bear at whatever angle of attack is needed.

I made a small gage that's nothing more than a block of steel with height equal to the height of the lathe centerline above the top of the compound. Push this up against the tool and run your fingernail across the juxtaposed block and tool tip. Even very minute height differences can be easily detected - your fingertips are exquisitely sensitive to such differences.

Waddaya mean you can't see the sense of QCTP's? Sounds like you've got an even better one since yours hold either 3 or 4 tools in each "holder" instead of just 1. Sounds kinda cool now that you mention it.

Cheers,

BW
 
Circlip said:
The ultra quick way to set height is to put a rule between the tool tip and the O/D of the bar. If top leans towards you add packing and vicky verky Regards Ian.
After learning how to grind a lathe bit, that's the next thing I learned :) Inserting the tool bit into the QCTP and using the 6" ruler to set the height. Quick and easy !

Forgot you can use on the mill to find round stock center - Thanks for that reminder ! I have one of those inverted V gadgets you stick in the mill spindle that will center round stock very easily too !
 
Guess we're just old fuddy duddies Marv, I don't understand why the Carbide Kings( :big:) need a plethora of QC holders either. When I first used one lots of years ago I thought "Wow no need for packing any more" and it was so easy to change the tool in the holder and quickly readjust the height, back in those days, even in the toolroom we only had two holders, one for square tools and one for boring tools and NO carbides. I always fancied making one but even now when they're relatively cheap i still haven't converted. Got a slack handfull of welded tip carbides but a big boxfull of HSS. Regards Ian.
 
Thanks Bob for that link to the videos- haven't dl any yet, but I'll check them out later.

Thanks also for all the great tips- soon as I've had brekky I'm off to try the 'ruler' method :)
 
Back
Top