Don't Tell ANYONE Else Your a Home Hobby Machinist!

Home Model Engine Machinist Forum

Help Support Home Model Engine Machinist Forum:

This site may earn a commission from merchant affiliate links, including eBay, Amazon, and others.

rake60

Well-Known Member
Joined
Jul 8, 2007
Messages
4,756
Reaction score
125
I live in a small town.
Everyone knows I have a small shop here.
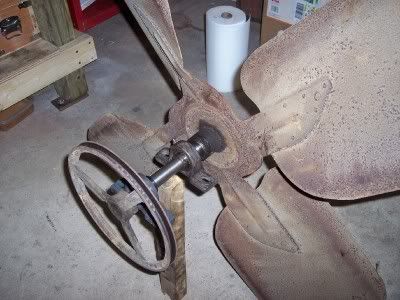
I was asked to stop in at a local greenhouse to take a look at a piece of
equipment that wasn't working properly.
No Problem! By the time I got there the owner was well on his way to
tightening up a few loose bolts on the machine.

Then he points up to the 42" fan near the ceiling and says: "Can you fix that?" :-\
Soooo I climb up to have a look. One of the pillow block bearing is locked up and
shaft is a little sloppy.
No Problem! I learned how to dismantle the fan as I went and brought the fan shaft
assembly home.

When I finally got it apart I realized the shaft was worn a little more than I'd thought.
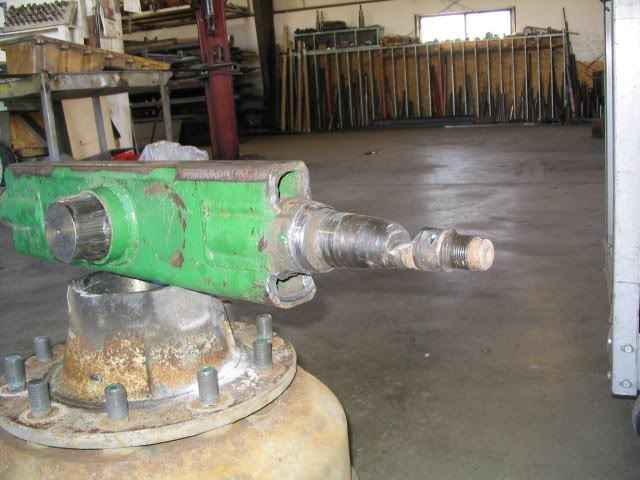
WornFanShaft.jpg

That ain't right! LOL That is supposed to be .998" for it's entire length.

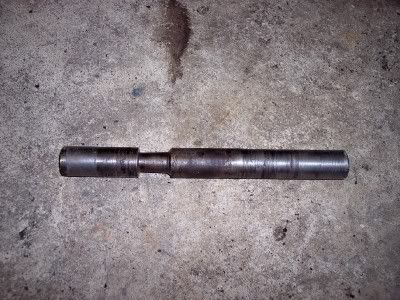
It only took about an hour to do the turning and mill work on the new shaft and reassemble the fan.
Only smashed one thumb taking the fan off the original shaft.
rolleyes-1.gif

FinishedFanShaft.jpg


At any rate I have a happy neighbor and a few extra $$ for the weekend.
It would still be a simpler life if they never knew...

Rick
 
How many years do you guess that shaft has been running without lubrication? It looks like it's down
to about 5/8 inch.
...lew...
 
Naw that looks like it has a 100,000 miles left on it:eek:) I'd put some grease on it and run it:eek:)

Wes
 
Lew Hartswick said:
How many years do you guess that shaft has been running without lubrication? It looks like it's down
to about 5/8 inch.
...lew...

Well he did mention that it had been squeaking for some time. LOL
The whole assembly had a thick coating of old black grease over it.
That resulted in dime size grease stains every three feet apart and on every other
stair on the wife's new light grey carpeting.
knuppel2.gif


OUCH!

Rick
 
At any rate I have a happy neighbor and a few extra $$ for the weekend.
It would still be a simpler life if they never knew...
You also have a living neighbor. Could you imagine what would happen if that fan came apart while running. :fan:
Tim
 
I know the feeling Rick. I live in a small town too. I've wound up doing stuff for the local hot rod guys. Now there's a bunch of hacks if you ever saw any. I make a few bucks doing the jobs. Keeps me in beer money and tooling. Plus I get to experiment on there stuff. ;D

I'm doing one right now for a guy that wants his 9" front rotors on his drag car to have five bolts instead of the four the rotors came with on a 4.5" bolt circle. One guy said it can't be done. That's all it took. I couldn't walk away from that challenge.

I'll have to post some pics of how I did it.

Bernd
 
I'd love to see those pics Bernd!

I know the title of this thread is "Don't tell ANYONE..."
But actually it's a good feeling to have the skills and tools to help out when you can.

So an engine part that was in the machine will need to be set up again.
Big Deal!

There are plenty of job shops out there who would be very happy to make a simple
part for an individual in need for $65/hr machine time.
We can do it to help out a neighbor for a hell of a lot less, and we should!

No, it's NOT model engineering, and there will be some who say this thread shouldn't
even be allowed to exist on this forum.

I say it DOES belong here!

We have the means help others in our own communities.
USE THEM for that!
It won't cost you anything more than a different thought process on making a part.
You might even learn something along the way. ;)

Rick


whats the problem? He still has a little meat on that bone. :big:

http://i111.photobucket.com/albums/n159/rake60/WornFanShaft.jpg

I have seen 1" shafts down to 3/8" before.

here is a good one I fixed. there is the spindle and the hub. you can see how it was in the process of self machining. thats called grease rot.

wornshaft.jpg


I do weird jobs that shops charge too much for like tap a hole in the end of a crank shaft, some guys are intimidated by things like that.

What you did is make a friend, now if he is a good guy he brings cash and beer. if he just brings beer he is a user. We can buy our own damn beer with cash.

Just today I saw A guy at my brothers shop who owes be a case of coors for machine work, I did not say a word, I want him to owe me so he does not ever come back. If I want to work for free it will be on my own stuff. ;)
 
What we have in the two pictures shown is a classic case of Reliability Centred Maintenance (RCM) in action. The basic Tenet of RCM is that we don't maintain the equipment until it's about to fail, therby saving many fruitless hours of taking something apart to see why it works.

What should happen now is that the owner of the equipment should think back how long the equipment has been in use and put in his 10 year diary a date the same distance forwards to renew the shaft again.

Al
 
I believe these types of posts do belong here. Any type of machine work has its place here as any repairs made can be used in a smaller scale but the main thing is it gets us to thinking of how we can use the info to work on our smaller engines and things. The learning process never stops.
 
Here they are Rick.

rotor1.jpg


A lot going on here in the first pic. On the left are the rotors that will have the new wheel studs put in them. They are longer than the regular studs that go in. There's one laying between the two sets of rotors. The ones on the right didn't fit the spindle so the guy wanted to take the studs out of the ones on the right and put them in on the ones on the left. Notice the holes are plugged on the ones on the left. They had the four hole pattern. I'm was asked to put in the 5 hole pattern on a 4.5" bolt circle. The plug holes are the original bolts. I turn the shoulder off of them, drove them flush and cut off the threaded end and ground them down flush with the face of the rotor. Next I made a template out of aluminum and put a five hole bolt pattern in it using Marvs chord program. Worked very nice, thanks Marv. The holes are .5" reamed holes. I them turned a counter bore 5.812" dia. by about .125" deep (the plate is .25" thick). This will fit over the rotor and locate the holes. Then I made a guide with a .5" "spigot" by .100" long that's a nice fit in the .5" hole. Drilled and reamed a 3/16" hole down the center and used a piece of drill rod for a center punch (I'll have to add a pic of that).

rotor2.jpg


This pic shows the template mounted on the rotor ready to have the holes located.

rotor3.jpg


Just took this pic. This what I made to transfer the holes with from the template.

Unfortunately I never got to drill the holes out. The problem with the rotors on the right was that the spindle would hit the cored hole through the center. Also I didn't realize that these are 9" rotors and could be turned in my Logan lathe which has a 10" swing. So I bore into it about 1/4". The guy has to pick them up to see if that will cure the problem.

If he had brought over everything the first time I could have had them fixed much faster. Problem here was communication. He didn't convey exactly what was wrong and I didn't quite understand the problem. He just wanted to know if I could drill a 5 hole bolt pattern in a rotor that had a 4 hole bolt pattern. Did learn a few things along the way though. And if was fun doing a bit of problem solving. Nice if it's only a hobby and you don't have to do it for work. ;D

I'll post the results here when I get them. I also might still try and drill those holes out just to see if I can do it.

Bernd
 
Back
Top